Hands-on Tutorial
Table of Contents
- Introduction
- Getting Started
- Understand the Go Build Process
- Build and Push Go Container to the Internal Registry
- Building a .NET Service from a UBI image
- Build and Push .NET Container to the Registry
- Deploy the Microservice Application
- Access the Application on OpenShift
- Lab Wrap up
- OpenShift Multi-Arch Compute
1 Introduction
In this lab, you will take an Open-Source E-Commerce solution written for x86 around eight years ago and make it run on Power with OpenShift, using Java, Node.js, Go and .NET microservices.
1.1 The Sock Shop
The Sock Shop is a sample microservices application created by Weaveworks that Luke Marsden presented at Code Mesh 2016. The complete recording of the presentation is available for replay below.
Weaveworks created the Sock Shop to address a gap in microservices demonstrations. While there was much discussion about microservices back then, most demos were overly simplistic examples (like a basic counter or guestbook application) that didn’t reflect real-world complexity. Weaveworks wanted to create a more realistic reference application to demonstrate microservices’ best practices.
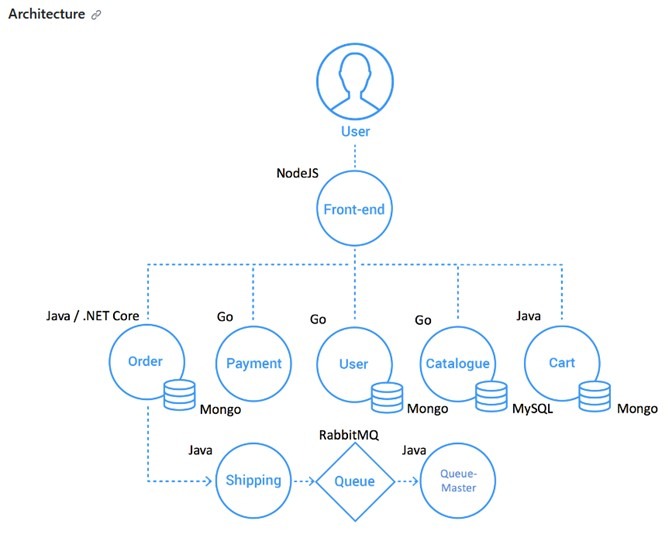
The Sock Shop is an e-commerce application for selling socks. While visually simple, its backend architecture demonstrates actual microservices patterns:
- Multiple independent services that can be maintained, upgraded and deployed separately
- Services written in different programming languages (including Go, Node.js, Java Spring and .NET)
- Each stateful service has its independent database to avoid schema coupling
- REST APIs for service communication
- Components include:
- Frontend UI
- Catalog service
- Cart service
- User/account service
- Order service
- Multiple databases
The application was designed to be cross-platform compatible, with implementations for multiple container orchestration platforms including Docker Compose, Kubernetes, DC/OS, and Amazon ECS. This made it valuable as a testing ground for different orchestration technologies and deployment patterns.
The Sock Shop served as both a learning tool for microservices best practices (and mistakes) and as a realistic test application for container orchestration platforms and related tooling.
1.2 The Hands-on Lab
The Sock Shop application was written around eight years ago, way before the components and OpenShift was available and supported on IBM Power. Today, you will modify two of the x86 microservice components to work on IBM Power ppc64le with Red Hat OpenShift. Of course, all the other components have also been modified to work on IBM Power, but due to the time available to us today, we will concentrate on the user (Go) and orders (.NET) microservices and deploy the complete application with already updated, prebuilt images. You are welcome to work through the other microservices outside of this lab/class.
The purpose of the lab is to show you how a microservice-based solution designed and written for x86 may also easily run on IBM Power. Developer experience is not required.
The first part of the lab will focus on getting familiar with using the lab environment:
- Connecting to the SSH command line interface for the bastion
- Connecting to the OpenShift Console via Web Browser
- Loging into OpenShift via the command line interface
The second part of the lab will focus on:
- Cloning and analyzing the user microservice created using Go for x86
The third part of the lab will focus on:
- Building the Go microservice on Power and pushing to the OpenShift Internal Registry
The fourth part of the lab will focus on:
- Cloning and analyzing the orders microservice created with .NET for x86
- Creating a Dockerfile to build the .NET orders microservice on Power
The fifth part of the lab will focus on:
- Building the .NET microservice on Power and pushing to the OpenShift Internal Registry
The sixth part of the lab will focus on:
- Deploying the microservice solution on Power with OpenShift
The seventh part of the lab will focus on:
- Accessing the solution
The eighth part of the lab will focus on:
- Wrapping up the hands-on lab exercise
The final part of the lab guide provides additional information about the new Red Hat OpenShift Multi-Arch Compute functionality.
Please Note:
Commands that you should execute are displayed in bold blue txt. Left click within this area to copy the command to you clipboard.Example output from commands that have been executed are displayed with white txt with black background.- Bullet items are required actions
Standard paragraphs are for informational purposes.
Below is a silent walkthrough of this hands-on lab, alongside instructions. I will add commentary when I have time.
2 Getting Started
This part of the demo will guide you through the process of cloning the code hosted on GitHub and inspecting the files to understand how the code is organized to build container images. This part of the demo will be carried out using the root user. Rootless containers are possible, but more effort is needed, so we will run the demos as root today. In a production environment, we would not use root, but the process is similar.
You can watch this lab on an unlisted YouTube playlist below
2.1 Assumptions
- You have access to an OpenShift Container Platform (OCP) environment
- Make a note of the OCP Console URL
- You have access to a RHEL-based Bastion LPAR
- Make a note of the Bastion IP address
- The OCP user that you use is “cecuser”, if not, then just substitute “cecuser” for your own OCP user name
- Make a note the OCP user name; if not using “cecuser”
- Make a note of the “cecuser” password
2.2 Connect to the Bastion CLI
Now we will go over the steps to connect to the CLI for the environment.
I typically use the Putty application, but you are free to use your favourite terminal.
Putty is available for download HERE
- Install Putty from the above link if desired.
- Open the Putty application.
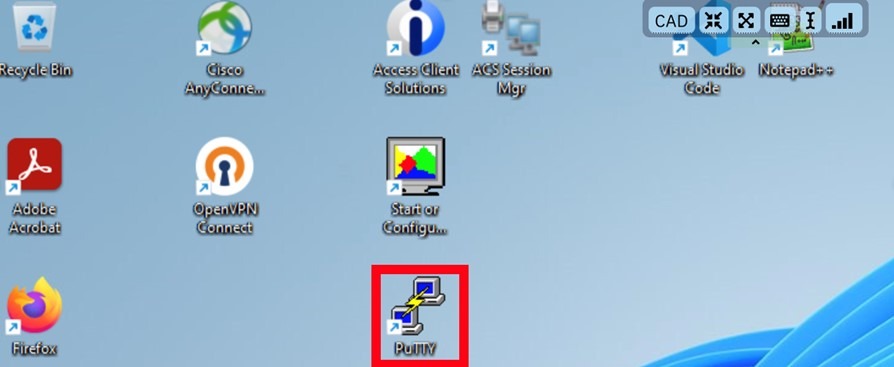
- If you are using IBM TechZone resources, fill the hostname with the IP address of your Bastion. The hostname and IP address may be found in your assigned Project Kit.
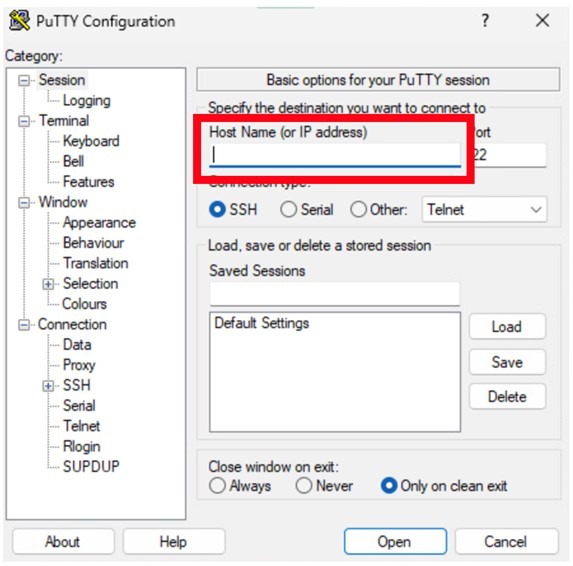
- Press Open
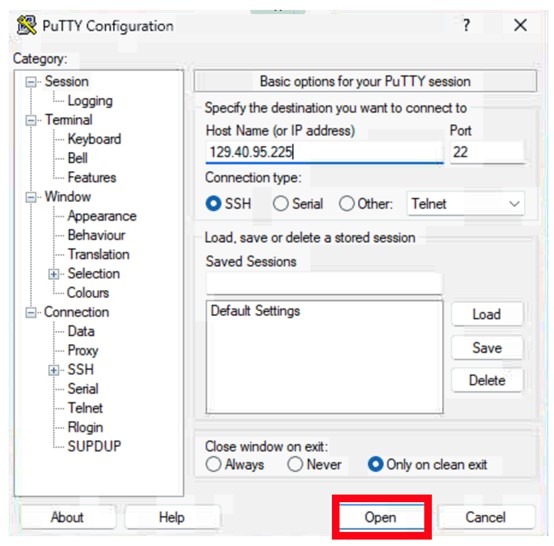
- Click Accept
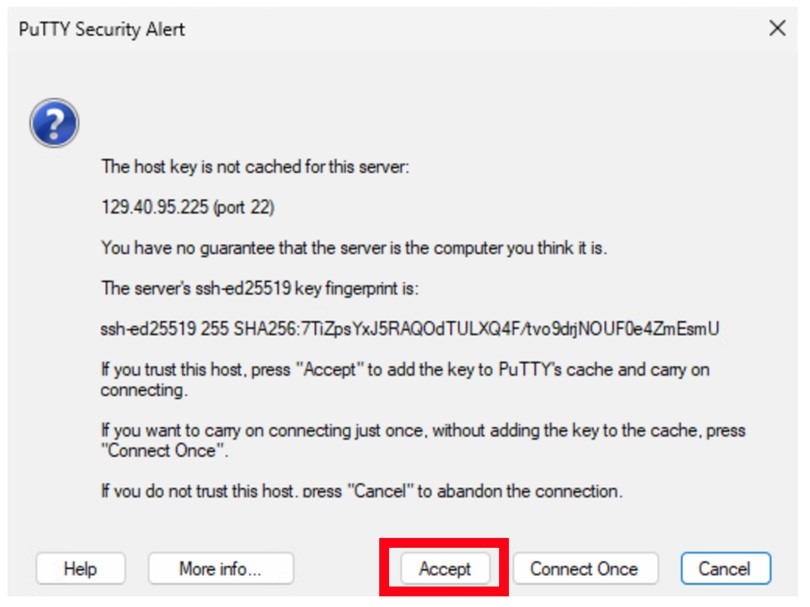
- You will see a “login as:” prompt. Type cecuser and press enter:
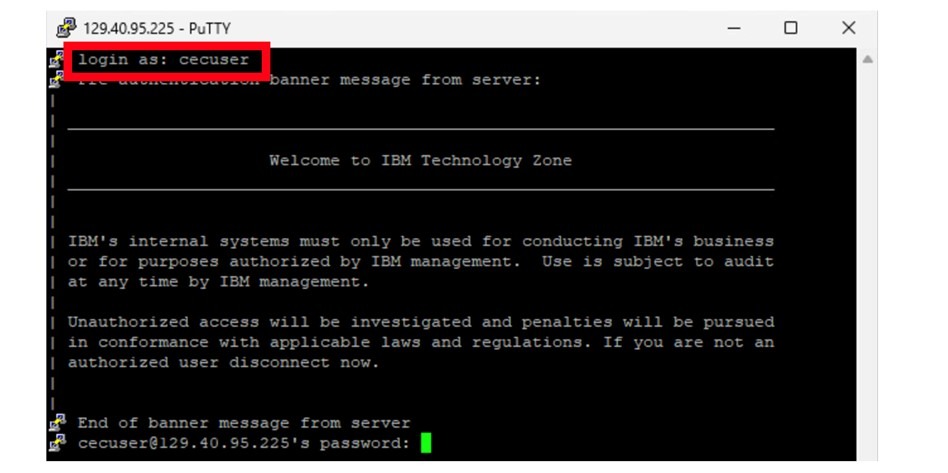
- Enter the password for the “cecuser” user. This will be the same for both the CLI and the GUI.
2.3 Login to OpenShift
To log in to the OpenShift environment from the command line, find the oc login command in your OpenShift GUI.
- Point your browser to your OpenShift web console
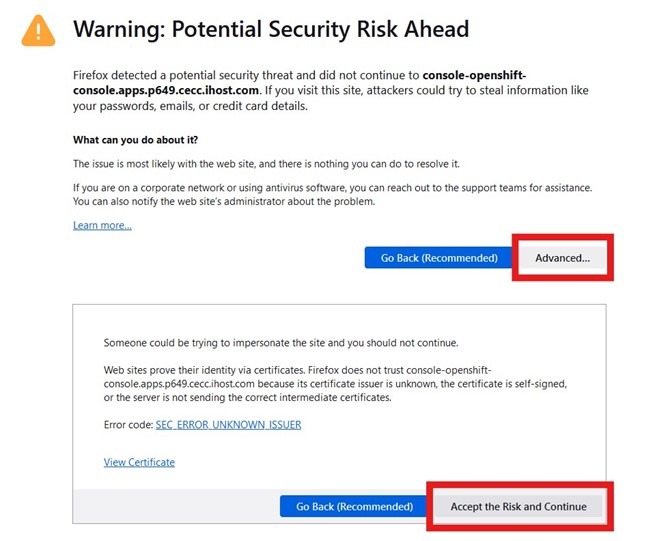
- Accept the certificate warning if certificates have not been configured correctly on demo equipment.
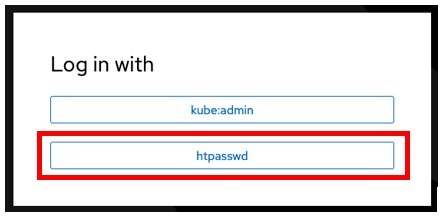
- Click on the htpasswd option:
- Add your user and password contained in step 2.1 and Click login.
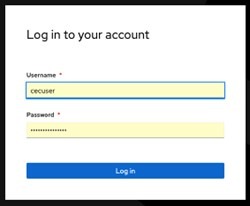
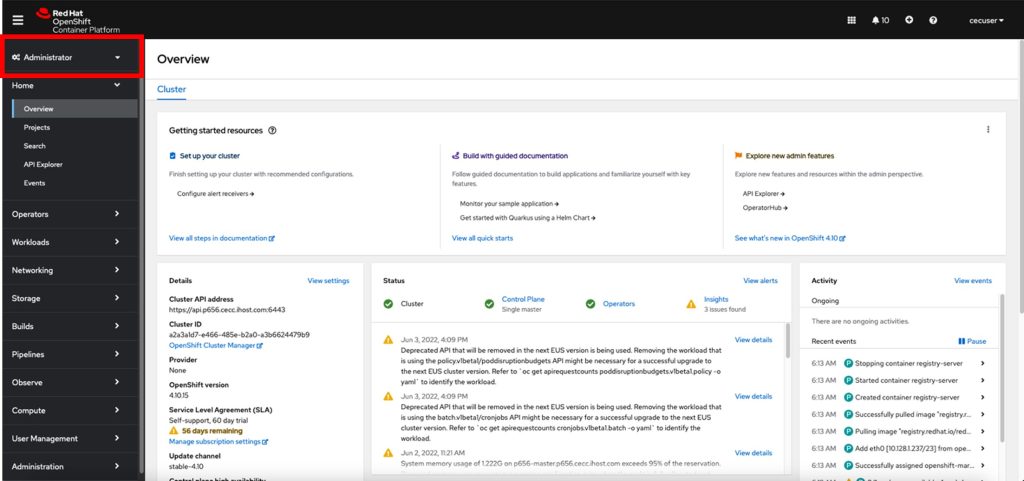
- If this is your first time, familiarize yourself with the navigation for approximately 10 minutes. You can easily switch between Developer and Administrator views using the menu option located at the top left corner.
2.4 Copy login command for CLI use
If you need to log in again to the CLI for any reason, you can find the login command from the main OpenShift web console page.
- On the top right side, you will see the cecuser drop-down; click on it and then on “Copy login command”
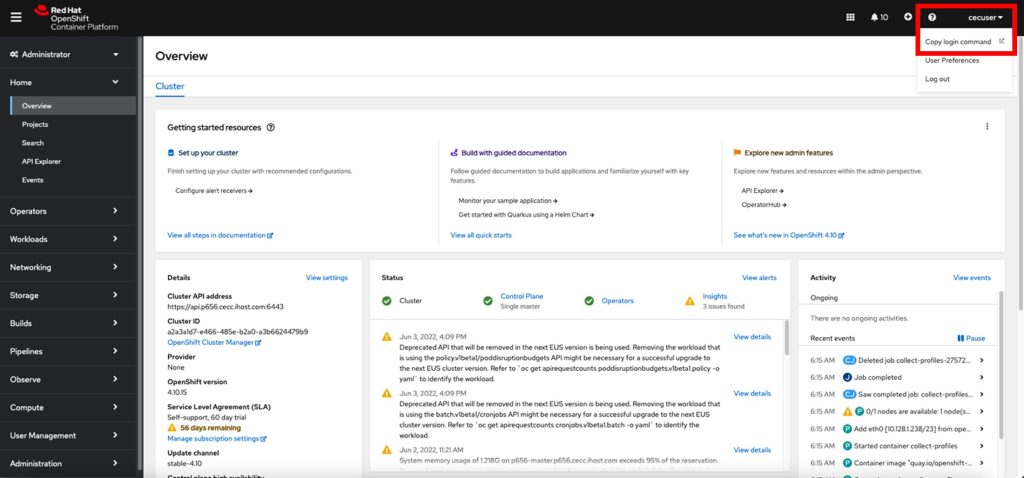
- Once again, click on the htpasswd option:

- Add your user and password described in step 2.1 and Click login.
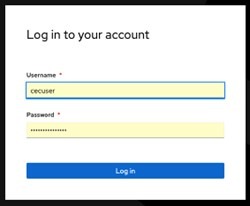
Click on Display Token on the top left

- You can use the oc login command whenever your Authorization has expired. You may need to use the API token to log in to the registry.

- As cecuser, copy and paste the oc login command from the web page into your Putty Session.
oc login --token=[Add your own token] server=[Add you own server]For example:
oc login --token=sha256~8HzJyuecqujfeCXsaDnAeUUJ9VMsLafr-cJk5yn8tGk --server=https://api.p1289.cecc.ihost.com:6443

Logged into "https://api.p1289.cecc.ihost.com:6443" as "cecuser" using the token provided.You have access to 71 projects, the list has been suppressed. You can list all projects with 'oc projects'Using project "default".
3 Understand the Go Build Process
This hands-on lab is intended for a Power Infrastructure person, so you just need to understand the following at a reasonably high level to give Developers guidance on how to develop for multiplatform.
Most of the time, all that is needed is to find the right image to compile the code and build the container.
You can view a recording of the lab exercise HERE
3.1 Clone from GitHub
- We will be running this demo using the root user. To get root access use the command as follows:
sudo su -Last login: Wed Oct 30 09:57:14 EDT 2024 from 129.40.95.89 on pts/2- Check you have the correct user. The whoami command should return root.
whoamiroot- Install Git
dnf install git -yUpdating Subscription Management repositories.
Red Hat Enterprise Linux 8 for Power, little en 19 kB/s | 3.8 kB 00:00
Red Hat CodeReady Linux Builder for RHEL 8 Powe 63 kB/s | 4.5 kB 00:00
Red Hat Enterprise Linux 8 for Power, little en 22 kB/s | 4.1 kB 00:00
Red Hat Enterprise Linux 8 for Power, little en 49 kB/s | 4.5 kB 00:00
Red Hat Enterprise Linux 8 for Power, little en 78 MB/s | 58 MB 00:00
Dependencies resolved.
================================================================================
Package Arch Version Repository Size
================================================================================
Installing:
git ppc64le 2.43.5-1.el8_10 rhel-8-for-ppc64le-appstream-rpms 92 k
Installing dependencies:
emacs-filesystem
noarch 1:26.1-12.el8_10 rhel-8-for-ppc64le-baseos-rpms 70 k
git-core ppc64le 2.43.5-1.el8_10 rhel-8-for-ppc64le-appstream-rpms 13 M
git-core-doc noarch 2.43.5-1.el8_10 rhel-8-for-ppc64le-appstream-rpms 3.1 M
perl-Error noarch 1:0.17025-2.el8 rhel-8-for-ppc64le-appstream-rpms 46 k
perl-Git noarch 2.43.5-1.el8_10 rhel-8-for-ppc64le-appstream-rpms 79 k
perl-TermReadKey
ppc64le 2.37-7.el8 rhel-8-for-ppc64le-appstream-rpms 42 k
Transaction Summary
================================================================================
Install 7 Packages
Total download size: 16 M
Installed size: 55 M
Downloading Packages:
(1/7): perl-Error-0.17025-2.el8.noarch.rpm 344 kB/s | 46 kB 00:00
(2/7): perl-TermReadKey-2.37-7.el8.ppc64le.rpm 257 kB/s | 42 kB 00:00
(3/7): emacs-filesystem-26.1-12.el8_10.noarch.r 394 kB/s | 70 kB 00:00
(4/7): git-2.43.5-1.el8_10.ppc64le.rpm 1.5 MB/s | 92 kB 00:00
(5/7): perl-Git-2.43.5-1.el8_10.noarch.rpm 1.0 MB/s | 79 kB 00:00
(6/7): git-core-doc-2.43.5-1.el8_10.noarch.rpm 23 MB/s | 3.1 MB 00:00
(7/7): git-core-2.43.5-1.el8_10.ppc64le.rpm 52 MB/s | 13 MB 00:00
--------------------------------------------------------------------------------
Total 39 MB/s | 16 MB 00:00
Running transaction check
Transaction check succeeded.
Running transaction test
Transaction test succeeded.
Running transaction
Preparing : 1/1
Installing : git-core-2.43.5-1.el8_10.ppc64le 1/7
Installing : git-core-doc-2.43.5-1.el8_10.noarch 2/7
Installing : perl-Error-1:0.17025-2.el8.noarch 3/7
Installing : perl-TermReadKey-2.37-7.el8.ppc64le 4/7
Installing : emacs-filesystem-1:26.1-12.el8_10.noarch 5/7
Installing : perl-Git-2.43.5-1.el8_10.noarch 6/7
Installing : git-2.43.5-1.el8_10.ppc64le 7/7
Running scriptlet: git-2.43.5-1.el8_10.ppc64le 7/7
Verifying : emacs-filesystem-1:26.1-12.el8_10.noarch 1/7
Verifying : perl-TermReadKey-2.37-7.el8.ppc64le 2/7
Verifying : perl-Error-1:0.17025-2.el8.noarch 3/7
Verifying : git-2.43.5-1.el8_10.ppc64le 4/7
Verifying : git-core-2.43.5-1.el8_10.ppc64le 5/7
Verifying : git-core-doc-2.43.5-1.el8_10.noarch 6/7
Verifying : perl-Git-2.43.5-1.el8_10.noarch 7/7
Installed products updated.
Installed:
emacs-filesystem-1:26.1-12.el8_10.noarch git-2.43.5-1.el8_10.ppc64le
git-core-2.43.5-1.el8_10.ppc64le git-core-doc-2.43.5-1.el8_10.noarch
perl-Error-1:0.17025-2.el8.noarch perl-Git-2.43.5-1.el8_10.noarch
perl-TermReadKey-2.37-7.el8.ppc64le
Complete!- Create a build directory.
mkdir build- Change to the newly created Directory.
cd build- Check you are in the correct Directory.
pwd/root/build- Inside the new directory under the root home, you can now clone the user project to your server.
git clone https://github.com/paulchapmanibm/microservices-demo-user.gitCloning into 'microservices-demo-user'...
remote: Enumerating objects: 1013, done.
remote: Counting objects: 100% (27/27), done.
remote: Compressing objects: 100% (17/17), done.
remote: Total 1013 (delta 13), reused 20 (delta 10), pack-reused 986 (from 1)
Receiving objects: 100% (1013/1013), 173.10 KiB | 4.81 MiB/s, done.
Resolving deltas: 100% (574/574), done.- You should see a new folder created:
ls -ladrwxr-xr-x. 3 root root 37 Oct 31 13:37 .
dr-xr-x---. 13 root root 4096 Oct 31 13:34 ..
drwxr-xr-x. 10 root root 4096 Oct 31 13:37 microservices-demo-user
- Change to this directory
cd microservices-demo-user- Check the directory
ls
api      docker                     Dockerfile.ubi8  LICENSE   README.md
apispec  docker-compose.yml         glide.lock       main.go   scripts
db       docker-compose-zipkin.yml  glide.yaml       Makefile  users
You can see some .go files. This normally means you are working with a Golang or simply a “Go” application. We will understand how Go applications are built in the next section.
3.2 Analyzing the Go build process
We will analyze the directory’s contents to ensure we understand how the application is built in container form. The Dockerfile is the main file that holds this information, as it determines the content of the container image and how it is built.
- Search the directory for the Dockerfile
ls -latotal 64
drwxr-xr-x. 10 root root 4096 Dec 17 06:22 .
drwxr-xr-x. 3 root root 37 Dec 17 06:22 ..
drwxr-xr-x. 2 root root 161 Dec 17 06:22 api
drwxr-xr-x. 2 root root 56 Dec 17 06:22 apispec
drwxr-xr-x. 3 root root 52 Dec 17 06:22 db
drwxr-xr-x. 4 root root 33 Dec 17 06:22 docker
-rw-r--r--. 1 root root 854 Dec 17 06:22 docker-compose.yml
-rw-r--r--. 1 root root 1447 Dec 17 06:22 docker-compose-zipkin.yml
-rw-r--r--. 1 root root 517 Dec 17 06:22 Dockerfile.ubi8
drwxr-xr-x. 8 root root 163 Dec 17 06:22 .git
drwxr-xr-x. 2 root root 86 Dec 17 06:22 .github
-rw-r--r--. 1 root root 27 Dec 17 06:22 .gitignore
-rw-r--r--. 1 root root 4398 Dec 17 06:22 glide.lock
-rw-r--r--. 1 root root 737 Dec 17 06:22 glide.yaml
-rw-r--r--. 1 root root 11357 Dec 17 06:22 LICENSE
-rw-r--r--. 1 root root 5200 Dec 17 06:22 main.go
-rw-r--r--. 1 root root 2437 Dec 17 06:22 Makefile
-rw-r--r--. 1 root root 2383 Dec 17 06:22 README.md
drwxr-xr-x. 2 root root 45 Dec 17 06:22 scripts
-rw-r--r--. 1 root root 1072 Dec 17 06:22 .travis.yml
drwxr-xr-x. 2 root root 141 Dec 17 06:22 usersNote the Dockerfile directory.
- List files inside the docker directory
ls -la dockertotal 4
drwxr-xr-x. 4 root root 33 Oct 3 16:52 .
drwxr-xr-x. 10 root root 4096 Oct 3 16:52 ..
drwxr-xr-x. 2 root root 32 Oct 3 16:52 user
drwxr-xr-x. 3 root root 39 Oct 3 16:52 user-db There are two “User” microservices. The application is based on Go, and the database on MongoDB. We will not alter MongoDB, but will focus on the “user” application today.
- Check the user directory inside the docker directory.
ls -la docker/usertotal 4
drwxr-xr-x. 2 root root 32 Oct 3 16:52 .
drwxr-xr-x. 4 root root 33 Oct 3 16:52 ..
-rw-r--r--. 1 root root 870 Oct 3 16:52 Dockerfile-release
- Check the Dockerfile-release file in the current docker/user directory. Do not try to understand it now; we will do this step by step during the demo.
cat docker/user/Dockerfile-releaseFROM golang:1.7-alpine
COPY . /go/src/github.com/microservices-demo/user/
WORKDIR /go/src/github.com/microservices-demo/user/
RUN apk update
RUN apk add git
RUN go get -v github.com/Masterminds/glide
RUN glide install && CGO_ENABLED=0 go build -a -installsuffix cgo -o /user main.go
FROM alpine:3.4
ENV SERVICE_USER=myuser \
SERVICE_UID=10001 \
SERVICE_GROUP=mygroup \
SERVICE_GID=10001
RUN addgroup -g ${SERVICE_GID} ${SERVICE_GROUP} && \
adduser -g "${SERVICE_NAME} user" -D -H -G ${SERVICE_GROUP} -s /sbin/nologin -u ${SERVICE_UID} ${SERVICE_USER} && \
apk add --update libcap
ENV HATEAOS user
ENV USER_DATABASE mongodb
ENV MONGO_HOST user-db
WORKDIR /
EXPOSE 80
COPY --from=0 /user /
RUN chmod +x /user && \
chown -R ${SERVICE_USER}:${SERVICE_GROUP} /user && \
setcap 'cap_net_bind_service=+ep' /user
USER ${SERVICE_USER}
CMD ["/user", "-port=80"]It is a big Dockerfile because the developer who created the microservice is using it to build and package in a single step. (This is not always the case. Some Dockerfiles may be simpler with build and packaging separated into different files and run at different times, which you will see with the .NET microservice later.)
Review the example below that has only the compiling section of the application.
FROM golang:1.7-alpine

COPY . /go/src/github.com/microservices-demo/user/
WORKDIR /go/src/github.com/microservices-demo/user/

RUN apk update
RUN apk add git
RUN go get -v github.com/Masterminds/glide
RUN glide install && CGO_ENABLED=0 go build -a -installsuffix cgo -o /user main.go- Starting from the building part of the Dockerfile, we see above that the project uses a very old Golang image (FROM golang:1.7).
- It copies the entire catalog source internally to the image and changes the working directory to where the package was copied.
- The Alpine Package Keeper (apk) performs an update and adds Git.
- It runs a `go get` for glide, which is an old tool for dependency support and is not needed in newer versions of go. (It is unlikely that up-to-date applications maintained by customers will still be using this.)
- Next `glide install` is used to install any dependencies, and `go build` to compile the main.go file.
Remember that our task at this point is not to understand the code but to build it to work on Power.
Given this build, we need an image for golang (from the first part delimited by “:”) that has a tag close to “1.7” that means a go image that is the closest to the version 1.7. It is better to use the same version even if newer ones are available because the code might use functions that were deprecated and discontinued on newer versions, and the idea at this stage is not to correct issues, just show that whatever is being done on x86 will build just fine on ppc64le.
Sometimes, the exact version is not possible to find (as in this case with Golang, because it is such an old image).
A common place to start looking for open-source images is often Docker Hub. However, Red Hat Quay.io is becoming a better choice to host images because of the limitations that Docker has started imposing on downloads from Dockerhub.
For the past three years, we have run this hands-on lab at conferences and workshops Globally, describing how to modify the above Dockerfile to run on IBM Power. Initially, we modified the Dockerfile to pull golang v1.11 because v1.7 is very old and does not support IBM Power ppc64le.
However, I discovered a problem with this approach in May 2024 whilst preparing to run the lab at a European Conference. The container version of GoLang on DockerHub was based on Debian v10, Buster, which went end of life in June 2024. In preparation for EOL, Debian moved the media to an archive folder. Two alternative solutions were considered, and both were tested successfully.
- Adjust the original GoLang Dockerfile to use the Debian archive.
- The preferred option is utilising the Red Hat Universal Base Image.
- Review the changes made for the preferred option #2 in the Dockerfile comments below.
# Changed to use the go-toolset from Red Hat
FROM registry.access.redhat.com/ubi8/go-toolset:latest as builder

# Sets the working directory
WORKDIR /go/src/github.com/microservices-demo/user/

# Change ownership of copied files
COPY --chown=1001:0 . /go/src/github.com/microservices-demo/user/

# The go mod init command creates a go.mod file to track your code's dependencies
# go mod tidy removes any unused dependencies and adds any missing dependencies to the go. mod file. It also updates the versions of the dependencies to the latest compatible versions, as specified in the go. mod file.
# go build is then used to compile the project
RUN  go mod init github.com/microservices-demo/user && go mod tidy && GOOS=linux go build .

# Uses the Red Hat Universal Base Image
FROM registry.access.redhat.com/ubi8/ubi-minimal:latest

# No change to environments
ENV HATEAOS user
ENV USER_DATABASE mongodb
ENV MONGO_HOST user-db

# Sets the working directory
WORKDIR /

# Exposes the network port 8080
EXPOSE 8080

# “builder” below refers to the Golang stage defined earlier
COPY --from=builder /go/src/github.com/microservices-demo/user/user /

# No change, sets network port to 8080
CMD ["/user", "-port=8080"]
- Now create the new Dockerfile, excluding the comments, based on the preferred option above.
echo 'FROM registry.access.redhat.com/ubi8/go-toolset:latest as builder
WORKDIR /go/src/github.com/microservices-demo/user/
COPY --chown=1001:0 . /go/src/github.com/microservices-demo/user/
RUN  go mod init github.com/microservices-demo/user && go mod tidy && GOOS=linux go build .
FROM registry.access.redhat.com/ubi8/ubi-minimal:latest
ENV HATEAOS user
ENV USER_DATABASE mongodb
ENV MONGO_HOST user-db
WORKDIR /
EXPOSE 8080
COPY --from=builder /go/src/github.com/microservices-demo/user/user /
CMD ["/user", "-port=8080"]'>Dockerfile
Now we have a single Dockerfile that will build the application on Power and containerize it in a single step, making it easier to integrate the software.
4 Build and Push Go Container to the Internal Registry
You may hear the names Docker registry, JFrog Artifactory, Nexus, Quay, or simply local registry. These registries are just different types of repositories for container images. Developers may use them for other parts, like maven repositories, but this goes beyond the scope of this lab.
For this lab, we will use the internal OpenShift Registry.
A centralized Enterprise image registry could be used, but creating such a registry is beyond the scope of this lab.
You can view a recording of the lab exercise HERE
4.1 Building the Go Container
With the Dockerfile created and the images for Power already known, the container-building process is straightforward.
- Run the command to get the image registry Route into a variable.
REGISTRYHOST=$(su - cecuser -c "oc get route default-route -n openshift-image-registry --template='{{ .spec.host }}'")- Verify the command correctly captured the host
echo $REGISTRYHOSTdefault-route-openshift-image-registry.apps.p1334.cecc.ihost.comThe route above will be different. It can’t be blank. If it is blank, make sure you log into the OCP as described in Section 2.4, “Copy login command for CLI use“.
- Run the podman command to build our new image using the Dockerfile we created previously and tag it to the internal registry for the course.
podman build -f Dockerfile --tag $REGISTRYHOST/sock-shop/user:latest[1/2] STEP 1/4: FROM registry.access.redhat.com/ubi8/go-toolset:latest AS builder
[1/2] STEP 2/4: WORKDIR /go/src/github.com/microservices-demo/user/
--> Using cache 2963cdf719c22d60e3a2769d903b80a65097b5bd1e0feff1e6d2e3984546b75d
--> 2963cdf719c2
[1/2] STEP 3/4: COPY --chown=1001:0 . /go/src/github.com/microservices-demo/user/
--> 3e88177147fb
[1/2] STEP 4/4: RUN go mod init github.com/microservices-demo/user && go mod tidy && GOOS=linux go build .
go: creating new go.mod: module github.com/microservices-demo/user
.
.
.
[2/2] STEP 8/8: CMD ["/user", "-port=8080"]
--> Using cache fbf41164ff850402a9cd942471aa3519efa94b260364dfa4a098ff4664967299
[2/2] COMMIT default-route-openshift-image-registry.apps.p1390.cecc.ihost.com/sock-shop/user:latest
--> fbf41164ff85
Successfully tagged default-route-openshift-image-registry.apps.p1390.cecc.ihost.com/sock-shop/user:latest
fbf41164ff850402a9cd942471aa3519efa94b260364dfa4a098ff4664967299
[root@p1390-bastion microservices-demo-user]#
This created two new images on your podman, one that has no reference (the one used to build) and another one that is the user image.
===================================================
For information only.
The original weaveworks project repository was deprecated and marked as archived by an administrator on Dec 29, 2023. It is no longer maintained. It is now read-only.
On Sunday, November 10th, 2024, I noticed that the open-source openzipkin component had changed, causing the build of this Go User container to fail. The change occurred after the end of October when I recorded the demonstration. The output from the failing podman build command is below. Do not worry; this information is included to demonstrate that deprecated and archived microservices written for x86 may still work on IBM Power. Developers can easily overcome challenges like this.
go: github.com/microservices-demo/user imports
        github.com/openzipkin/zipkin-go-opentracing: github.com/openzipkin/zipkin-go-opentracing@v0.5.0: parsing go.mod:
        module declares its path as: github.com/openzipkin-contrib/zipkin-go-opentracing
                but was required as: github.com/openzipkin/zipkin-go-opentracing
Error: building at STEP "RUN go mod init github.com/microservices-demo/user && go mod tidy && GOOS=linux go build .": while running runtime: exit status 1
I discussed the problem with colleagues, and Paul Bastide, who kindly fixed the build problem with the fix: API remapping.
Whilst the above fix enabled the successful build of the Golang User microservice container for ppc64le, I found that the container would not deploy successfully within OpenShift, due to the problems below.
• panic: runtime error: invalid memory address or nil pointer dereference”
• middleware/instrument.go:54″ problem.
I have, therefore, modified the main.go file to fix the above problems.
I am not a developer, but fixed the problem in a few hours.
This is FYI only, you do not need to make any changes yourself. Please continue as directed.
===================================================
- Check the two images created using podman images.
podman images |head -3REPOSITORY TAG IMAGE ID CREATED SIZE
<none> <none> 21da94494a8a 7 minutes ago 1.37 GB
default-route-openshift-image-registry.apps.p1319.cecc.ihost.com/sock-shop/orders latest 581098362bee 18 hours ago 215 MBYou are ready to push the images to be used in production.
4.2 Push the Go image to the internal registry
We will now push the new image to the internal registry.
- Login into the registry using podman
podman login $REGISTRYHOST -u cecuser -p $(su - cecuser -c "oc whoami -t") --tls-verify=falseLogin Succeeded!- Verify the command correctly captured the host.
echo $REGISTRYHOSTdefault-route-openshift-image-registry.apps.p1309.cecc.ihost.comThe route above will be different. It can’t be blank. If it is blank, make sure you log into the OCP as described 2.4 “Copy login command for CLI use“.
- Create the sock-shop project.
oc new-project sock-shopNow using project "sock-shop" on server "https://api.p1323.cecc.ihost.com:6443".
You can add applications to this project with the 'new-app' command. For example, try:
oc new-app rails-postgresql-example
to build a new example application in Ruby. Or use kubectl to deploy a simple Kubernetes application:
kubectl create deployment hello-node --image=k8s.gcr.io/e2e-test-images/agnhost:2.33 -- /agnhost serve-hostname
- Push the created image to the internal registry.
podman push $REGISTRYHOST/sock-shop/user:latest --tls-verify=falseGetting image source signatures
Copying blob 3e6445d4d7b9 skipped: already exists
Copying blob cb362e6b8e29 skipped: already exists
Copying config dcc16061c7 done |
Writing manifest to image destination5 Building a .NET Service from a UBI image
We will now create our own .NET image using the RedHat UBI container.
You can view a recording of the lab exercise HERE
5.1 Clone the .NET application from GitHub
- Change to the build directory.
cd /root/build- Check you are on the correct Directory.
pwd/root/build- Inside the new directory under the root home, you can now clone the orders project to your server.
git clone https://github.com/paulchapmanibm/ordersdotnet.gitCloning into 'ordersdotnet'...
remote: Enumerating objects: 322, done.
remote: Counting objects: 100% (322/322), done.
remote: Compressing objects: 100% (132/132), done.
remote: Total 322 (delta 166), reused 308 (delta 159), pack-reused 0
Receiving objects: 100% (322/322), 56.50 KiB | 4.71 MiB/s, done.
Resolving deltas: 100% (166/166), done.- You should see a new folder created:
ls -latotal 12
drwxr-xr-x. 4 root root 57 Oct 3 17:27 .
dr-xr-x---. 15 root root 4096 Oct 3 16:50 ..
drwxr-xr-x. 10 root root 4096 Oct 3 17:04 microservices-demo-user
drwxr-xr-x. 10 root root 4096 Oct 3 17:27 ordersdotnet- Change to this directory
cd ordersdotnet/- Check the directory
lsappsettings.json docker orders.NET.csproj Program.cs scripts
Config LICENSE orders.net_deploy_rsa.enc Properties Value
Controllers Models orders.NET.sln README.md
You can see a .csproj file. This normally means you are working with a C# program and if dotnet/aspnet frameworks are used (like in this project) we can use dotnet provided by Red Hat, which includes C# libraries.
5.2 Understanding the NET build process
The Dockerfile is the main file that holds this information, as it determines the content of the container image and how it is built.
- From the last directory listing you can see that there is a docker directory, list its contents.
ls -l dockertotal 0
drwxr-xr-x. 2 root root 47 Oct 3 17:27 orders.net- You can see that there is an orders directory, list its contents.
ls -l docker/orders.nettotal 8
-rw-r--r--. 1 root root 242 Oct 3 17:27 Dockerfile
-rw-r--r--. 1 root root 190 Oct 3 17:27 Dockerfile-msft- You found the Dockerfile and now you can inspect it.
cat docker/orders.net/DockerfileFROM microsoft/dotnet:latest
COPY . /app
WORKDIR /app
RUN ["dotnet", "restore"]
RUN apt-get update && apt-get install -y tcpdump jq
RUN ["dotnet", "build"]
EXPOSE 80/tcp
ENTRYPOINT ["dotnet", "run", "--server.urls", "http://0.0.0.0:80"]Analyzing the Dockerfile, you can see that:
- The “FROM” specifies the microsoft/dotnet image.
- The “COPY” will copy all the code that is in the current directory in the server into the container.
- The “WORKDIR” sets the directory where commands should take place.
- The “RUN” commands:
- restores the dependencies and tools of a project.updates the package index files and installs the tcpdump package.
- builds the project and its dependencies into a set of binaries.
- The “EXPOSE” specifies that port 80 should be used.
- The “ENTRYPOINT” statement is the main command to run on the container. When started it is an array of entries (the spaces are delimited by comas).
Notice that the Dockerfile specifies using dotnet run, which would mean using the SDK to run and not the runtime. We will change this to use the runtime instead, and this will create a smaller image.
We will also use this lab as a way of creating our own SDK and runtime images instead of going to docker hub. We will build the packages from the Red Hat ubi8-minimal image which contains dotnet libraries.
UBI is the Universal Base Image container framework from Red Hat – UBI images are cut-down versions of RHEL specifically for use as base OS container images.
More info can be found here:
microdnf is a cutdown package manager used within UBI images. Think of it as a skinny yum.
- Create a Dockerfile for the dotnet-runtime
echo 'FROM ubi8-minimal
USER root
RUN microdnf install -y dotnet-runtime-7.0 aspnetcore-runtime-7.0 && microdnf clean all' >Dockerfile_dotnet-runtime- Create a Dockerfile for the dotnet SDK
echo 'FROM ubi8-minimal
USER root
RUN microdnf install -y dotnet-sdk-7.0 && microdnf clean all' >Dockerfile_dotnet
Now we can build the images that we will use to compile and run the code.
- Build the image for the .NET
podman build -f Dockerfile_dotnet --tag dotnet:latestSTEP 1/3: FROM ubi8-minimal
STEP 2/3: USER root
--> Using cache a020ec5df868404dafd1badf8068a89473464336688de7251b36861247435a81
--> a020ec5df868
STEP 3/3: RUN microdnf install -y dotnet-sdk-7.0 && microdnf clean all
--> Using cache a0594907c8823ba0bf2f35e15acd37828b1e60be1ae1622eea54179305b263d4
COMMIT dotnet:latest
--> a0594907c882
Successfully tagged localhost/dotnet:latest
a0594907c8823ba0bf2f35e15acd37828b1e60be1ae1622eea54179305b263d4- Build the image for the .NET Runtime
podman build -f Dockerfile_dotnet-runtime --tag dotnet-runtime:latestSTEP 1/3: FROM ubi8-minimal
STEP 2/3: USER root
--> Using cache a020ec5df868404dafd1badf8068a89473464336688de7251b36861247435a81
--> a020ec5df868
STEP 3/3: RUN microdnf install -y dotnet-runtime-7.0 aspnetcore-runtime-7.0 && microdnf clean all
--> Using cache 4d692386eafd7165a4b30f606f405b0129e82ba584b499391d44476070d2a3b5
COMMIT dotnet-runtime:latest
--> 4d692386eafd
Successfully tagged localhost/dotnet-runtime:latest
4d692386eafd7165a4b30f606f405b0129e82ba584b499391d44476070d2a3b5Now that you built both images needed to build the microservice container, we can create a single Dockerfile that will take care of the build and create the final container that will run the orders service.
5.3 Creating the Dockerfile to build the microservice container
We will create a Dockerfile file to build the container using the below information:
#BUILD PART
#Start from (FROM) the image for maven used on the build script
#Call the container build “builder” using the “as” statement
#For that we will use the dotnet sdk we just created
FROM localhost/dotnet:latest as builder
#We copy all the code from the cloned project to the /app
COPY . /app
# We set the working directory for the /app
WORKDIR /app
# We run the two commands for the Build
RUN ["dotnet", "restore"]
RUN ["dotnet", "build"]
#This will build the application  on the /app/bin/Debug/net7.0
#CONTAINER CREATION PART
#Now to create the final container we will start from the dotnet-runtime we built
FROM localhost/dotnet-runtime:latest

#Copy the application built from the builder image
COPY --from=builder /app/bin/Debug/net7.0/ /app/
#Setting the working directory to /app just like the old Dockerfile
WORKDIR /app
# We will run the application orders.NET we created
ENTRYPOINT ["dotnet", "orders.NET.dll"]
Read the comments carefully, as this explains each of the Dockerfile steps. You will see how an image is created, which is very logical.
- Create the Dockerfile mentioned in the previous note without the comments.
echo 'FROM localhost/dotnet:latest as builder

COPY . /app

WORKDIR /app

RUN ["dotnet", "restore"]
RUN ["dotnet", "build"]

FROM localhost/dotnet-runtime:latest

COPY --from=builder /app/bin/Debug/net7.0/ /app/
WORKDIR /app
ENTRYPOINT ["dotnet", "orders.NET.dll"]'>Dockerfile
Now we have a single Dockerfile that will build the application and containerize it on a single step, making it easier to integrate the software.
6 Build and Push .NET Container to the Registry
You may hear the names Docker registry, JFrog Artifactory, Nexus, Quay or simply local registry, these registries are just different types of repositories for container images. Developers may use them for other parts like maven repositories, but it goes beyond the scope of this lab.
For this lab, we will use the internal OpenShift Registry.
A centralized Enterprise image registry could be used, but the creation of an Enterprise registry goes beyond the scope of this demo.
You can view a recording of the lab exercise HERE
6.1 Building the .NET Container
With the Dockerfile created and the images for Power already known, the container building process is straightforward.
- Run the command to get the image registry Route into a variable
REGISTRYHOST=$(su - cecuser -c "oc get route default-route -n openshift-image-registry --template='{{ .spec.host }}'")- Verify the command correctly captured the host.
echo $REGISTRYHOSTdefault-route-openshift-image-registry.apps.p1309.cecc.ihost.comThe route above will be different, It can’t be blank, if it is blank make sure you login to the OCP like stated in Section Log into OpenShift via the command line interface.
- Run the podman command to build using the Dockerfile we created on the previous step and tag it to the internal registry for the course.
podman build -f Dockerfile --tag $REGISTRYHOST/sock-shop/orders:latest[1/2] STEP 1/5: FROM dotnet:latest AS builder
[1/2] STEP 2/5: COPY . /app
--> 9e75fe1e9b7
[1/2] STEP 3/5: WORKDIR /app
--> ae710361dcb
[1/2] STEP 4/5: RUN ["dotnet", "restore"]
Welcome to .NET 7.0!
---------------------
SDK Version: 7.0.100
---------------------
.
.
.
--> adda01ef96a
[2/2] STEP 1/4: FROM dotnet-runtime:latest
[2/2] STEP 2/4: COPY --from=builder /app/bin/Debug/net7.0/ /app/
--> b40fefe8200
[2/2] STEP 3/4: WORKDIR /app
--> ea05fe42b9e
[2/2] STEP 4/4: ENTRYPOINT ["dotnet", "orders.NET.dll"]
[2/2] COMMIT default-route-openshift-image-registry.apps.p1389.cecc.ihost.com/sock-shop/orders:latest
--> bd1b4e1d045
Successfully tagged default-route-openshift-image-registry.apps.p1389.cecc.ihost.com/sock-shop/orders:latest
bd1b4e1d045afd9573329abdeaad2b1c369747bd76431e2b99fc07f7eb7bdb8e
This created two new images. Podman shows one that has no reference (the one used to build) and another one that is the orders microservice image.
- Check the two images created using podman images
podman images |head -4REPOSITORY TAG IMAGE ID CREATED SIZE
default-route-openshift-image-registry.apps.p1390.cecc.ihost.com/sock-shop/orders latest ddcdc4ba3dbc 43 seconds ago 215 MB
<none> <none> de1c27e23baa 46 seconds ago 1.05 GB
ds ago 1.05 GB
You are ready to push the images to be used in production.
6.2 Push the .NET images to the internal registry
We will push the new image to the internal registry.
- Login into the registry using podman
podman login $REGISTRYHOST -u cecuser -p $(su - cecuser -c "oc whoami -t") --tls-verify=falseLogin Succeeded!- Verify the command correctly captured the host.
echo $REGISTRYHOSTdefault-route-openshift-image-registry.apps.p1309.cecc.ihost.comThe route above will be different. It can’t be blank. If it is blank, make sure you log into the OCP as described 2.4 “Copy login command for CLI use“.
- Push the created image to the Internal registry
podman push $REGISTRYHOST/sock-shop/orders:latest --tls-verify=falseGetting image source signatures
Copying blob 4a275ce82a89 done |
Copying blob 38bf0ae868e4 done |
Copying blob 6237f8cea45b skipped: already exists
Copying config ddcdc4ba3d done |
Writing manifest to image destination
7 Deploy the Microservice Application
Now you have the modified the Microservices, you can deploy the microservices application using a yaml file. You can view a recording of the lab exercise HERE
- Download the application yaml file from GitHub
wget https://raw.githubusercontent.com/paulchapmanibm/assets/refs/heads/main/usvc/apptx.yaml--2024-12-16 13:24:10-- https://raw.githubusercontent.com/paulchapmanibm/assets/refs/heads/main/usvc/apptx.yaml
Resolving raw.githubusercontent.com (raw.githubusercontent.com)... 185.199.109.133, 185.199.110.133, 185.199.111.133, ...
Connecting to raw.githubusercontent.com (raw.githubusercontent.com)|185.199.109.133|:443... connected.
HTTP request sent, awaiting response... 200 OK
Length: 19840 (19K) [text/plain]
Saving to: ‘apptx.yaml’
apptx.yaml 100%[===================>] 19.38K --.-KB/s in 0.001s
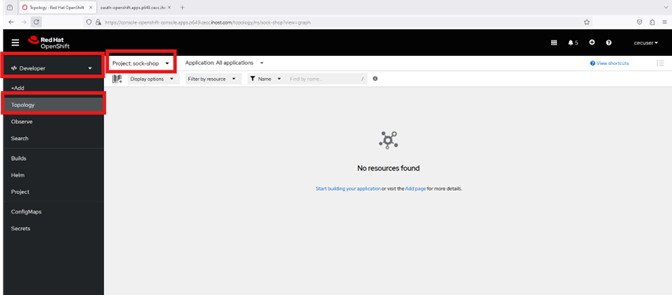
2024-12-16 13:24:10 (17.4 MB/s) - ‘apptx.yaml’ saved [19840/19840]- Open the Administrator console for your OpenShift cluster and navigate to the Developer view -> Topology and select sock-shop as the project. When you run the oc apply command below, you will see the microservices appear, they will start to build and run.
- Run the command below to create the application now.
oc apply -f ./apptx.yamlWarning: resource namespaces/sock-shop is missing the kubectl.kubernetes.io/last-applied-configuration annotation which is required by oc apply. oc apply should only be used on resources created declaratively by either oc create --save-config or oc apply. The missing annotation will be patched automatically.
namespace/sock-shop configured
deployment.apps/carts created
service/carts created
deployment.apps/carts-db created
service/carts-db created
deployment.apps/catalogue created
service/catalogue created
deployment.apps/catalogue-db created
service/catalogue-db created
deployment.apps/front-end created
service/front-end-external created
service/front-end created
deployment.apps/orders created
service/orders created
deployment.apps/orders-db created
service/orders-db created
deployment.apps/payment created
service/payment created
deployment.apps/queue-master created
service/queue-master created
deployment.apps/rabbitmq created
service/rabbitmq created
deployment.apps/session-db created
service/session-db created
deployment.apps/shipping created
service/shipping created
deployment.apps/user created
service/user created
deployment.apps/user-db created
service/user-db created
route.route.openshift.io/front-end-external created
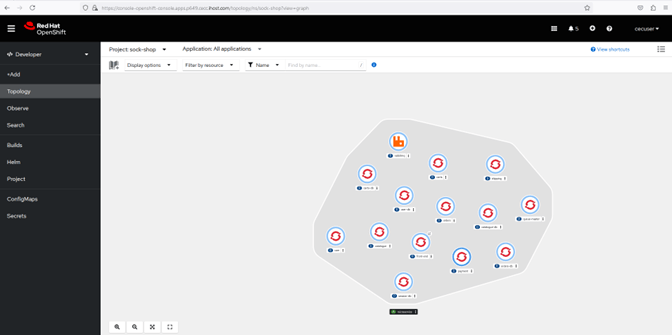
- When you run the oc apply command below above, you will see the microservices appear one by one in the OpenShift Console, as they start to build and run.
8 Access the Application on OpenShift
This is simply your opportunity to see the microservice solution that you deployed in action. Go ahead, have a play and do whatever you like, just remember that it is a developer’s environment and not a production system. Some functionality will not work as expected, and that is fine. The purpose of the lab is to demonstrate how easy it is to operate applications that were designed for x86, on IBM Power ppc64le with Red Hat OpenShift. You can view an example recording of this lab exercise HERE at 5:30
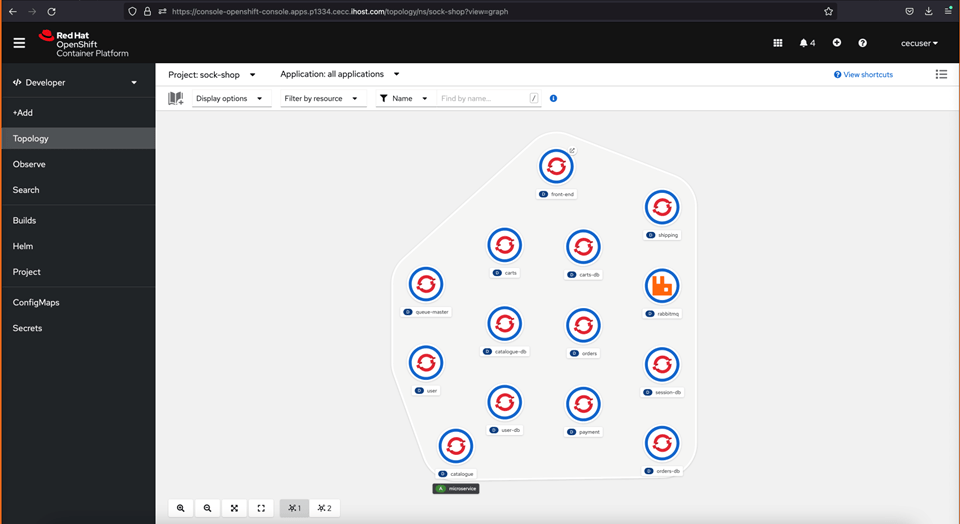
- Go to the Developer view on topology and select the sock-shop.

- See that the application is up and show the results. The application is ready when ALL microservices light blue circle turns dark blue, which may take 3-5 minutes.
- You may also use the watch the containerized microservices come online via the command line, as below
watch oc get podsEvery 2.0s: oc get pods p1319-bastion: Tue Dec 17 07:22:13 2024
NAME READY STATUS RESTARTS AGE
carts-6549b8dc7c-h6nj7 1/1 Running 0 3m46s
carts-db-5df64ddd7d-cpvpj 1/1 Running 0 3m46s
catalogue-5dbfd47689-rnd7r 1/1 Running 0 3m46s
catalogue-db-7d7d46c4bc-vm2dp 1/1 Running 0 3m46s
front-end-5f94569584-rrktx 1/1 Running 0 3m46s
orders-5779846fb-wz4t2 1/1 Running 0 3m46s
orders-db-86f6896f44-8hmnc 1/1 Running 0 3m46s
payment-b48fb4d8-4p92w 1/1 Running 0 3m46s
queue-master-8547599bd5-9zcql 1/1 Running 0 3m46s
rabbitmq-8455c774fd-dzzd6 2/2 Running 0 3m46s
session-db-5584678cdb-bsbnr 1/1 Running 0 3m46s
shipping-bd8674fc5-s4pds 1/1 Running 0 3m46s
user-7584dd8f98-r28xt 1/1 Running 0 3m45s
user-db-5d8465ff99-l4wxb 1/1 Running 0 3m45s
- Use CTRL + C to break out of the watch command, if executed
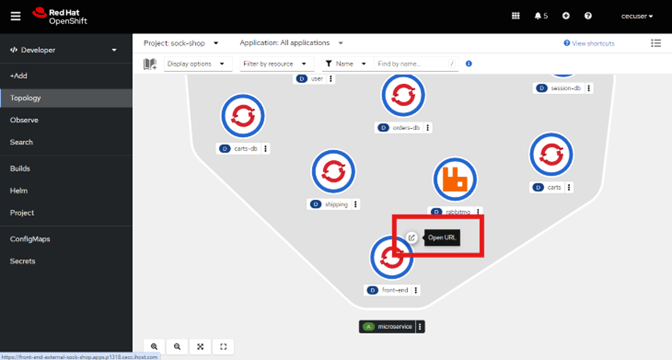
- Open the Sock Shop front end URL, (on the upper right side of the front-end pod), which takes you to the Sock Shop ecommerce website.
- If necessary, accept the certificate warning
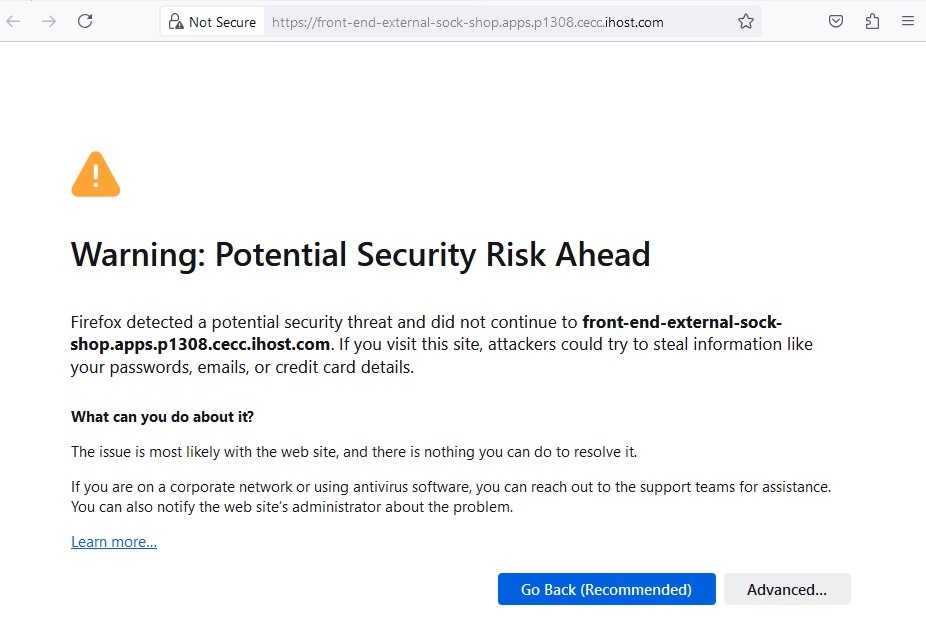
- Again, accept the certificate warning if necessary
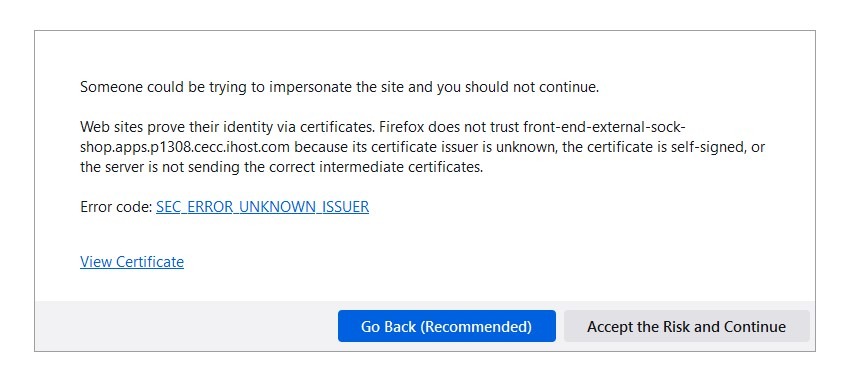
- Register a new account
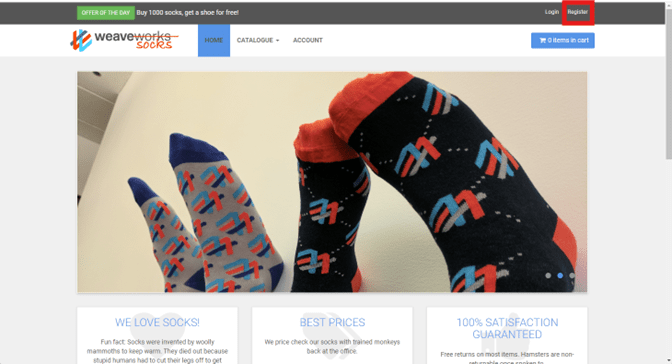
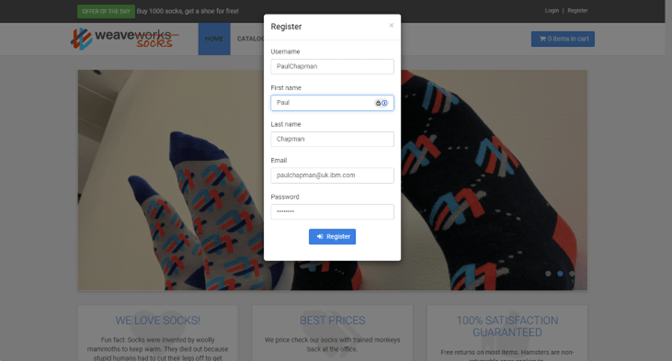
- Search the catalogue
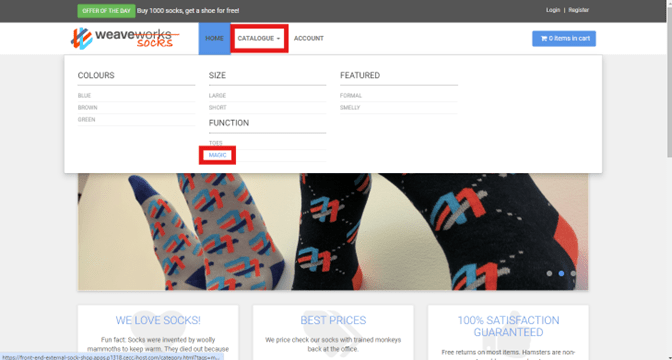
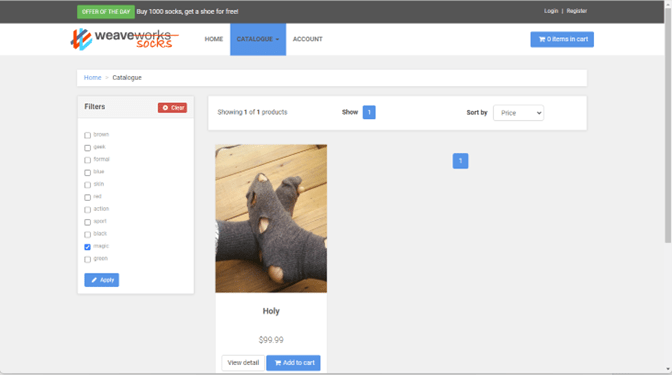
- View various socks
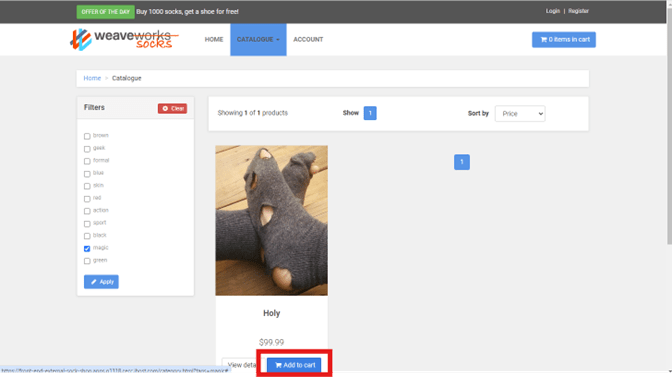
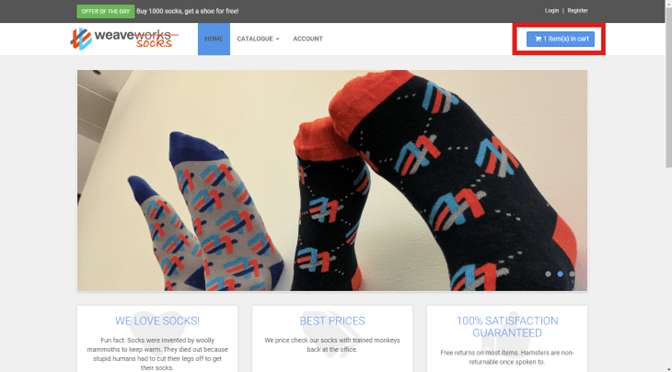
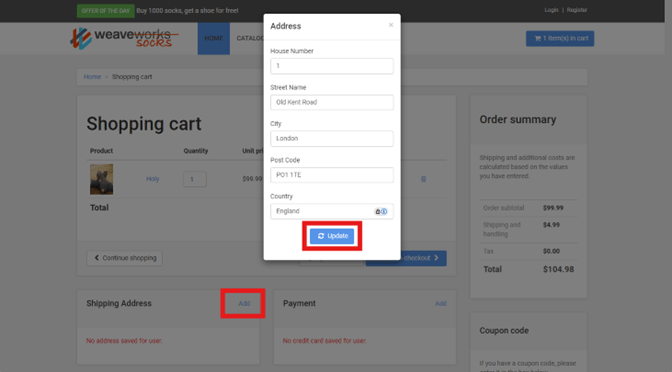
- Add socks to your shopping cart
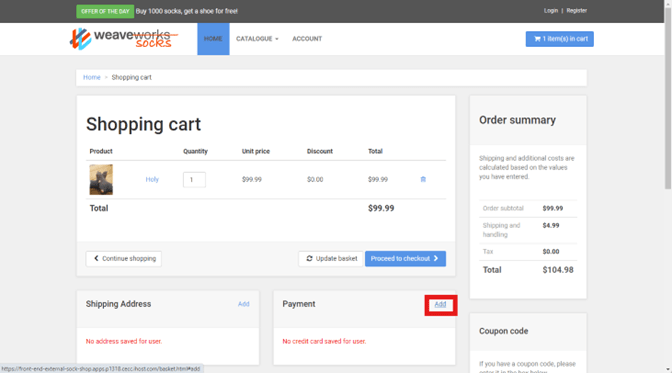
Example: Adding shipping address
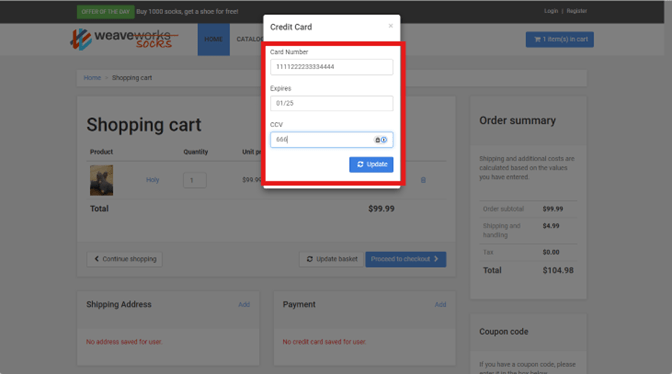
Example: Adding card payment information
Example: Adding Credit Card
9 Lab Wrap up
Congratulations, you have completed this lab. You went through the steps to build an application that was written for x86 eight years ago in a modern language on the Power ppc64le OpenShift Container Platform.
You should now be confident that you understand how the Go and .NET frameworks are already ported to Power. More than 15K images on Docker Hub can be used, and nearly 2,000 more certified containers are in the Red Hat Container Catalogue.
You now understand how to clone a GitHub repository. You have also seen a Dockerfile and how it is used to build images. You have built Power ppc64le images and worked with the OpenShift Internal Registry to publish the solution you created!
10 OpenShift Multi-Arch Compute
Additional OpenShift Multi-Architecture Compute recordings are available on my YouTube channel
10.1 YouTube
10.1.1 Introduction and Early Adoption Program Replay
10.1.2 UKI Brunch & Learn Replay
10.1.3 Deploy the Sock Shop Demonstration
10.1.4 Migrating Workloads between x86 & IBM Power Worker Nodes
10.2 IBM Redbook
The Creating OpenShift Multiple Architecture Clusters with IBM Power Redbook has now been published. Future versions may be downloaded HERE
10.3 Power Modernisation Website
Find more information relating to Power Modernisation, Hybrid Cloud and AI at my personal website.
10.4 Multi-Arch Compute Assistance
Let me know if you are considering an OpenShift Multi-Arch Compute project. Development, and I will be happy to discuss use cases and assist with your project.
Credit

Daniel Casali | Modernization – WW Subject Matter Expert
Leave a Reply