Hands-on lab guide
Table of Contents
2.1 Assumptions
2.2 Connect to the Bastion CLI
2.4 Copy login command for CLI use
3 Working with the inference runtime llama.cpp
3.1 Building an inference runtime container with llama.cpp library
3.2 Pushing the built image to OpenShift on a new project
3.3 Deploy the runtime using Mistral model on the namespace
3.4 Create a namespace and deploy the pre-built Mistral Model container
3.5 Build and deploy llama.cpp with LLM and OpenShift
4 Opening-the-Inference-runtime-UI
5 Retrieval-Augmented-Generation
5.1 Deploying-a-Vector-Database
1 Introduction
In this lab you’ll use a pre-trained Large Language Model and deploy it on OpenShift. It will make use of the unique Power10 features such as the Vector Scalar Extension (VSX) as well as the newly introduced Matrix Math Accelerator (MMA) engines.
This lab makes use of the following technologies.
IBM Power10 is a high-performance microprocessor designed for IBM Power servers. It features advanced architecture and technology innovations, such as a high-bandwidth cache hierarchy, improved memory subsystem, and support for
accelerated machine learning workloads. Power10 is designed to deliver high performance, scalability, and energy efficiency for enterprise and cloud computing applications.
IBM Power MMA (Matrix Math Accelerator) technology is a hardware-based solution designed to accelerate machine learning workloads on IBM Power servers. It includes specialized AI processors and software optimizations to improve the performance of machine learning tasks, such as training and inference, on these systems.
Vector Scalar Extension (VSX) is a set of instructions and architecture extensions for IBM POWER processors that enables efficient processing of vector (array-like) data types. VSX allows for faster and more efficient execution of tasks that involve large amounts of data, such as scientific computing, data analysis, and machine learning workloads.
A large language model (LLM) is an artificial intelligence model trained on a vast amount of text data, enabling it to generate human-like text based on the input it receives. These models can be used for various natural language processing tasks such as translation, summarization, and conversation.
RAG stands for Retrieval Augmented Generation. It’s a method that combines the power of retrieval systems with language models to generate more accurate and relevant responses. In this approach, the model first retrieves relevant information from a large external knowledge source (like a database or the internet), and then uses this information to generate a response.
llama.cpp is an open-source software library written mostly in C++ that performs inference on various large language models such as Llama. It is co-developed alongside the GGML project, a general-purpose tensor library.
Command-line tools are included with the library, alongside a server with a simple web interface.
MinIO is an open-source, high-performance object storage server compatible with the Amazon S3 API. It’s designed to provide reliable and scalable storage for cloud-native applications, big data, and AI workloads. MinIO is a community-driven project supported by MinIO Inc., a company founded by the original creators of MinIO.
MinIO offers several key features:
- High Performance: MinIO is optimized for high throughput and low latency, making it suitable for large-scale object storage deployments.
- Scalability: It can handle petabytes of data and thousands of concurrent users, allowing you to scale your storage needs as required.
- Reliability: MinIO ensures data durability and availability with built-in replication and erasure coding capabilities.
- Security: It supports encryption at rest and in transit, ensuring the confidentiality and integrity of your data.
- Integration: MinIO is compatible with the Amazon S3 API, making it easy to migrate existing applications and workflows to MinIO.
MinIO is widely used in various industries, including cloud computing, big data, AI, and machine learning, due to its high performance, scalability, reliability, and security features. It’s an excellent choice for organizations looking for a robust, open-source object storage solution.
Milvus is an open-source vector database built for AI applications, particularly those involving machine learning models that generate high-dimensional vectors for similarity search and clustering. It’s designed to handle large-scale vector data with low latency and high throughput, making it ideal for applications like recommendation systems, image and video search, and natural language processing.
Milvus offers several key features:
- Vector Search: Milvus enables fast and efficient vector similarity search, allowing you to find similar vectors in large datasets
quickly. - Scalability: It can handle petabytes of data and thousands of concurrent queries, ensuring your AI applications can scale as needed.
- Flexibility: Milvus supports various vector types, including embeddings, features, and distances, making it suitable for a wide range of use cases.
- Integration: Milvus is compatible with popular machine learning frameworks like TensorFlow, PyTorch, and scikit-learn, allowing you to integrate it seamlessly into your existing workflows.
- Real-time Analytics: Milvus supports real-time vector search, enabling you to process and analyze data in near real-time.
Milvus is used in various industries, including e-commerce, gaming, and entertainment, to power AI applications that rely on vector similarity search and clustering. It’s an excellent choice for organizations looking for a scalable, flexible, and high-performance vector database for their AI applications.
Streamlit is an open-source Python library for creating interactive web applications for data science, machine learning, and machine learning model deployment. It enables data scientists and developers to build user-friendly interfaces for their models, making it easier to share and deploy AI solutions with non-technical users.
Streamlit offers several key features:
- Interactive Web Apps: Streamlit allows you to create interactive web applications that display your data, visualizations, and machine learning models in a user-friendly interface.
- Easy to Use: Streamlit has a simple and intuitive API, making it easy to build and deploy web applications without requiring extensive web development knowledge.
- Real-time Updates: Streamlit supports real-time updates, allowing users to see changes to your data or models instantly.
- Sharing and Deployment: Streamlit makes it easy to share your applications with others by generating a URL that can be accessed by anyone. You can also deploy your applications as web apps using platforms like Heroku, AWS, or Google Cloud.
- Integration: Streamlit is compatible with popular data science libraries like Pandas, NumPy, and Scikit-learn, making it easy to integrate machine learning models into your web applications.
Streamlit is used in various industries, including finance, healthcare, and marketing, to build user-friendly interfaces for AI solutions.
It’s an excellent choice for data scientists and developers looking to share and deploy their AI models with non-technical users.
Etcd is a distributed key-value store that provides a reliable way to store and manage configuration data, service discovery, and remote procedure calls (RPCs) in distributed systems. It’s widely used in container orchestration platforms like Kubernetes, Docker Swarm, and Mesos to manage the configuration and state of these systems.
Etcd offers several key features:
- Distributed Key-Value Store: Etcd is a distributed key-value store that stores data across multiple nodes, ensuring high availability and fault tolerance.
- Reliability: Etcd provides strong consistency guarantees and ensures that data is never lost, even in the event of node failures.
- Scalability: Etcd can handle large-scale deployments with thousands of nodes and petabytes of data.
- Security: Etcd supports encryption at rest and in transit, ensuring the confidentiality and integrity of your data.
- Integration: Etcd is compatible with various programming languages and platforms, making it easy to integrate into existing systems.
Etcd is used in various industries, including cloud computing, big data, and AI, to manage the configuration and state of distributed systems. It’s an excellent choice for organizations looking for a reliable, scalable, and secure key-value store for their distributed systems.
1.1 About this hands-on lab
The first part of the lab in Section 2 focuses on how to access and interact with the lab and describes the following steps:
- Connecting to the SSH console for the bastion
- Connecting to the OpenShift Web GUI interface on a browser
- Connecting to the OpenShift Command Line Interface (CLI) via PuTTY
The second part of the lab in Sections 3 and 4 focuses on these topics:
- Building the llama.cpp container from scratch
- Deploying the llama.cpp container within a project in OpenShift
The Third part of the lab in Section 5 demonstrates the use of Retrieval-Augmented Generation (RAG) and focuses on these topics:
- Deploying a vector database
- Querying the AI model on additional data provided via RAG
2 Getting Started
Please Note:
Commands that you should execute are displayed in bold blue txt. Left click within this area to copy the command to you clipboard.Example output from commands that have been executed are displayed with white txt with black background.- Bullet items are required actions
Standard paragraphs are for informational purposes.
2.1 Assumptions
- You have access to an OpenShift Container Platform (OCP) environment running on IBM Power10
- Refer to my colleague’s blog, “Sizing and configuring an LPAR for AI workloads“
- Make a note of the OCP Console URL
- You have access to a RHEL based Bastion LPAR
- Make a note of the Bastion IP address
- The OCP user that you use is “cecuser”, if not, then just substitute “cecuser” for your own OCP user name
- Make a note the OCP user name, if not using “cecuser”
- Make a note of the “cecuser” password
2.2 Connect to the Bastion CLI
Now we will go over the steps to connect to the CLI for the environment.
I typically use the Putty application, but you are free to use your favourite terminal.
Putty is available for download HERE
- Install Putty from the above link if desired.
- Open the Putty application.

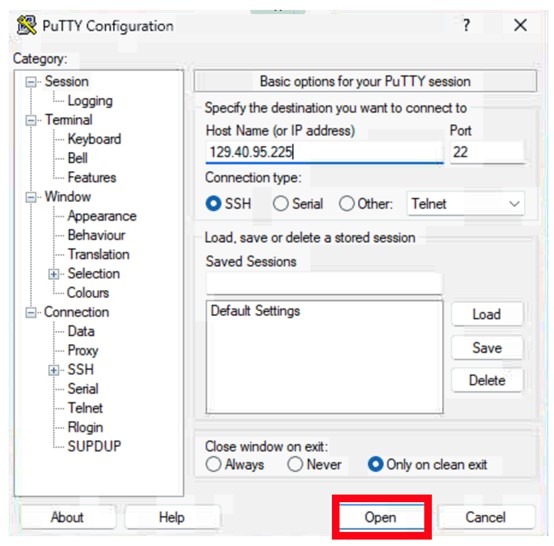
- Fill the hostname with the IP address of your Bastion. This may be found in your assigned Project Kit if using IBM TechZone resources.
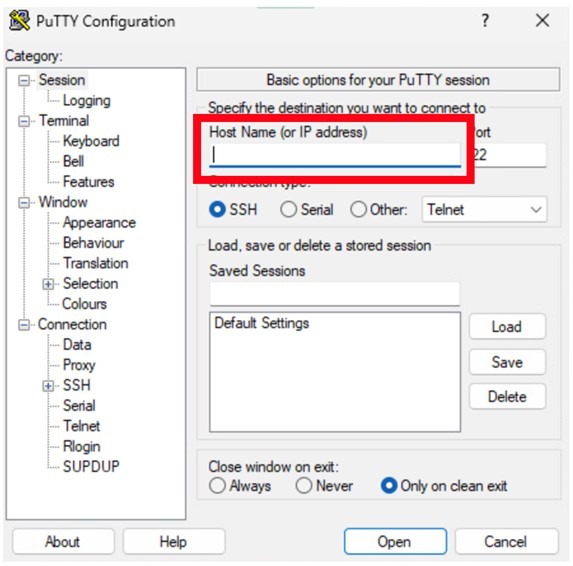
- Press Open
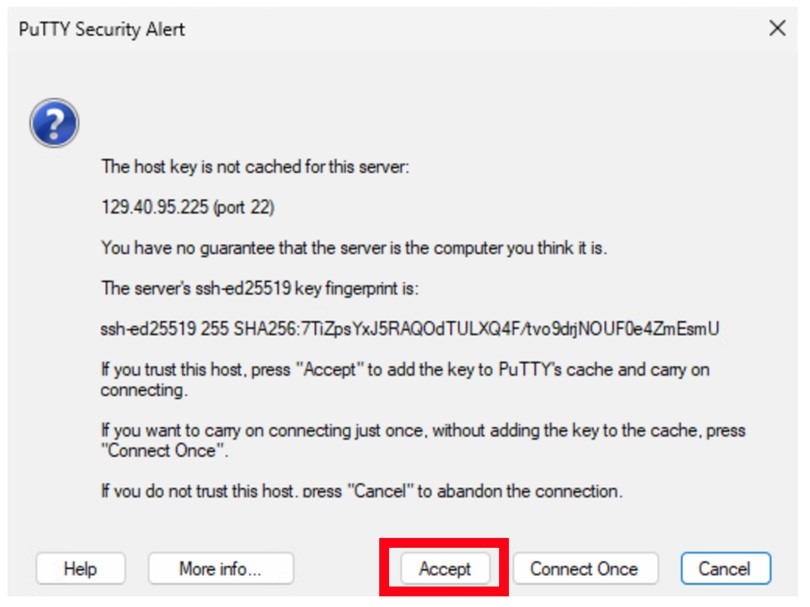
- Click Accept
- You will see a “login as:” prompt, type cecuser and press enter:
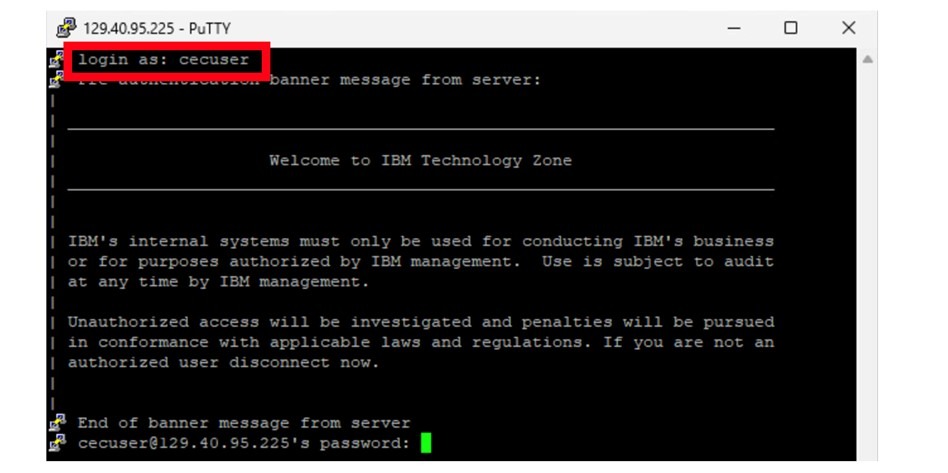
- Enter the password for the “cecuser” user. This will be the same for both the CLI and for the GUI.
2.3 Login to OpenShift
To login to the OpenShift environment from the command line, find the oc login command from your OpenShift GUI.
- Point your browser to your OpenShift web console
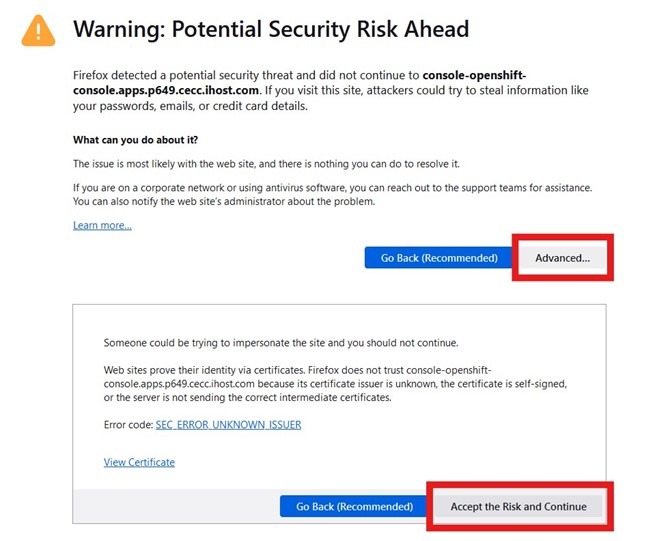
- Accept the certificate warning if certificates have not been configured correctly on demo equipment.
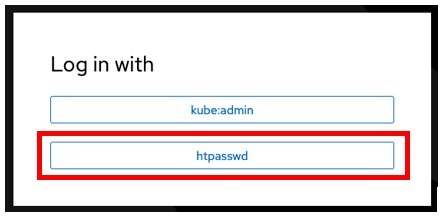
- Click on the htpasswd option:
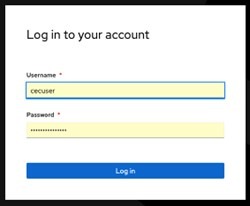
- Add your user and password contained on the step 1 and Click login.
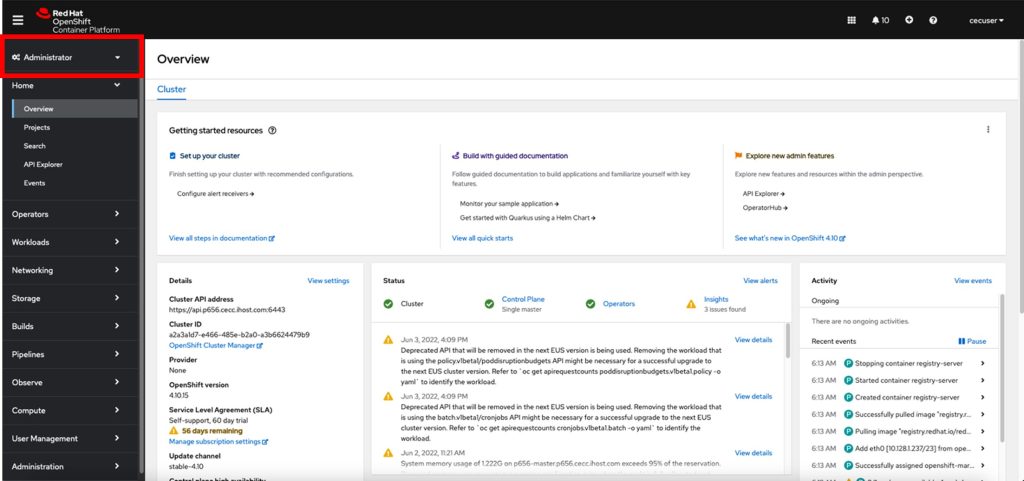
- Familiarize yourself with the navigation for approximately 10 minutes if it’s your first time. You can easily switch between Developer and Administrator views using the menu option located at the top left corner.
2.4 Copy login command for CLI use
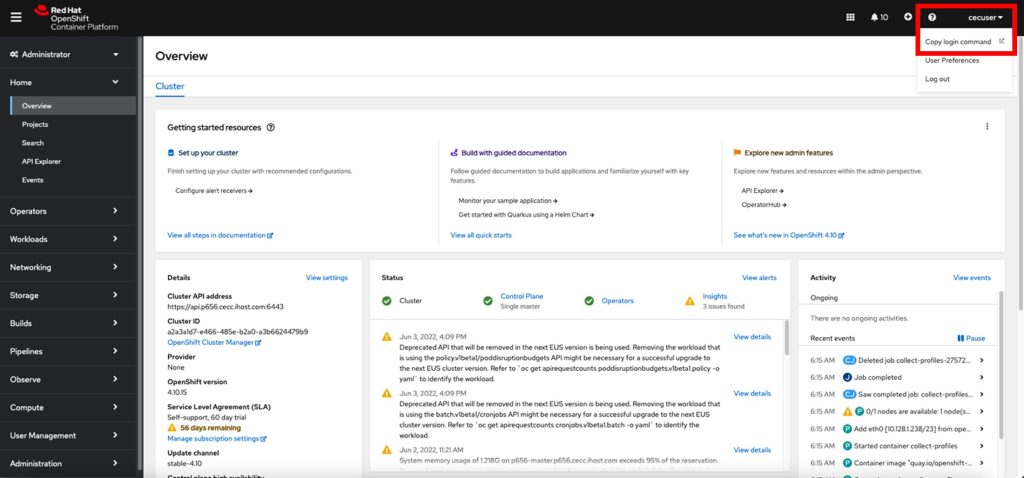
If you need to login again to the CLI, for any reason, you can find the login command on main OpenShift web console page.
- On the top right side, you will see the cecuser drop down click on it and then on “Copy login command”
- Once again click on the htpasswd option:

- Add your user and password contained on the step 1 and Click login.

- Click on Display Token on the top left

- You can use the oc login command whenever your Authorization is expired. You may need to use the API token for login in into the registry.

- As cecuser, copy and paste the oc login command from the web page into your Putty Session.
oc login --token=[Add your own token] server=[Add you own server]For example:
oc login --token=sha256~8HzJyuecqujfeCXsaDnAeUUJ9VMsLafr-cJk5yn8tGk --server=https://api.p1289.cecc.ihost.com:6443

Logged into "https://api.p1289.cecc.ihost.com:6443" as "cecuser" using the token provided.You have access to 71 projects, the list has been suppressed. You can list all projects with 'oc projects'Using project "default".
3 Working with the inference runtime llama.cpp
Do not mistake llama.cpp with the Llama models that Facebook made available. You may run Llama models into llama.cpp but you can also run other models like Mistral and Granite too.
There are pre-built containers available to use with this lab too. If you want to perform the creation process of the Inference library llama.cpp container from scratch, follow through sections 3.1 to 3.3 (it requires additional memory in your bastion LPAR and takes about 10 minutes of extra lab time). If you want to avoid that and use a pre-built container instead, skip sections 3.1 to 3.3 and go to section 3.4.
The easiest way to get up and running fast, is typically to head straight to Section 3.5, where you initiate the build and deployment from the bastion, but within OpenShift.
TechZone and TechXchange users should move directly to Section 3.5 as you will not have enough memory on your Bastion to compile the source and build the containers.
3.1 Building an inference runtime container with llama.cpp library
By following this chapter, you can build the runtime container from scratch using the Dockerfile bellow. This Dockerfile is already automatically loaded to your system when performing the git clone command below.
Please note, that this exercise requires significant memory to complete. If you do not have enough memory on your bastion, then you can skip direct to section 3.4, where you are directed to build and deploy the application within OpenShift.
Skip directly to Section 3.5 for the easiest way to build and deploy the llama.cpp application from within OpenShift. TechZone and TechXchange users should move directly to Section 3.5 as you will not have enough memory on your Bastion to compile the source and build the containers.
FROM registry.access.redhat.com/ubi9/ubi as builder

#################################################
# Creating a compiler environment for the build
#################################################
RUN dnf update -y  && dnf -y groupinstall 'Development Tools' && dnf install -y \
  cmake git ninja-build \
  && dnf clean all

####################################################
# Downloading and compiling OpenBLAS for a compiler environment for the build #
####################################################
RUN git clone --recursive https://github.com/DanielCasali/OpenBLAS.git && cd OpenBLAS && \
    make -j$(nproc --all) TARGET=POWER10 DYNAMIC_ARCH=1 && \
    make PREFIX=/opt/OpenBLAS install && \
    cd /

############################################################
# Downloading and compiling llama.cpp using the OpenBLAS Library we just compiled:
############################################################
RUN git clone https://github.com/DanielCasali/llama.cpp.git && cd llama.cpp && sed -i "s/powerpc64le/native -mvsx -mtune=native -D__POWER10_VECTOR__/g" ggml/src/CMakeLists.txt && \
    mkdir build; \
    cd build; \
    cmake -DGGML_BLAS=ON -DGGML_BLAS_VENDOR=OpenBLAS -DBLAS_INCLUDE_DIRS=/opt/OpenBLAS/include -G Ninja ..; \
    cmake --build . --config Release

CMD bash
########################################################
# Copying the built executable and libraries needed for the runtime on a simple ubi9 so it is a small container
########################################################
FROM registry.access.redhat.com/ubi9/ubi

COPY --from=builder --chmod=755 /llama.cpp/build/bin/llama-server /usr/local/bin
COPY --from=builder --chmod=644 /llama.cpp/build/src/libllama.so /llama.cpp/build/src/libllama.so
COPY --from=builder --chmod=644 /llama.cpp/build/ggml/src/libggml.so /llama.cpp/build/ggml/src/libggml.so

ENTRYPOINT [ "/usr/local/bin/llama-server", "--host", "0.0.0.0"]- Using the putty console you opened on step 2.3, you need to install git to clone the project that has the assets to help us through the Lab. Note that git may already be pre-installed in some of the lab environments.
sudo dnf -y install git- After git gets successfully installed, clone the project from GitHub:
git clone https://github.com/DanielCasali/mma-ai.gitCloning into 'mma-ai'...
remote: Enumerating objects: 8, done.
remote: Counting objects: 100% (8/8), done.
remote: Compressing objects: 100% (7/7), done.
remote: Total 8 (delta 1), reused 0 (delta 0), pack-reused 0 (from 0)
Receiving objects: 100% (8/8), 6.26 KiB | 6.26 MiB/s, done.
Resolving deltas: 100% (1/1), done.
- Enter the mma-ai/llama-runtime project:
cd mma-ai/llama-runtime/- Build the container to use for the runtime. You will use the Dockerfile you saw on the beginning of this section. You will use the OpenShift internal registry, so the command inside “$( )” retrieves the OpenShift internal registry host so we can tag the image there:
podman build . --tag $(oc get routes -A |grep image-registry|awk '{print $3}')/ai/llama-runtime-ubi:latest[1/2] STEP 1/5: FROM registry.access.redhat.com/ubi9/ubi AS builder
[1/2] STEP 2/5: RUN dnf update -y && dnf -y groupinstall 'Development Tools' && dnf install -y cmake git ninja-build && dnf clean all
Updating Subscription Management repositories.
Unable to read consumer identity
subscription-manager is operating in container mode.
.
.
.
[2/2] STEP 1/5: FROM registry.access.redhat.com/ubi9/ubi
[2/2] STEP 2/5: COPY --from=builder --chmod=755 /llama.cpp/build/bin/llama-server /usr/local/bin
--> 2066dbbb20a8
[2/2] STEP 3/5: COPY --from=builder --chmod=644 /llama.cpp/build/src/libllama.so /llama.cpp/build/src/libllama.so
--> 06e978aead69
[2/2] STEP 4/5: COPY --from=builder --chmod=644 /llama.cpp/build/ggml/src/libggml.so /llama.cpp/build/ggml/src/libggml.so
--> 896f86c2f229
[2/2] STEP 5/5: ENTRYPOINT [ "/usr/local/bin/llama-server", "--host", "0.0.0.0"]
[2/2] COMMIT default-route-OpenShift-image-registry.apps.p1325.cecc.ihost.com/ai/llama-runtime-ubi:latest
--> 1f99895367aa
Successfully tagged default-route-OpenShift-image-registry.apps.p1325.cecc.ihost.com/ai/llama-runtime-ubi:latest
The previous step takes some time to download and compile Open BLAS and llama.cpp.
3.2 Pushing the built image to OpenShift on a new project
- Create the ai project where you will run the container:
oc new-project aiNow using project "ai" on server "https://api.p1325.cecc.ihost.com:6443".
You can add applications to this project with the 'new-app' command. For example, try:
oc new-app rails-postgresql-example
to build a new example application in Ruby. Or use kubectl to deploy a simple Kubernetes application:
kubectl create deployment hello-node --image=registry.k8s.io/e2e-test-images/agnhost:2.43 -- /agnhost serve-hostname
- On the CLI, run the podman login command. The command within “$( )” retrieves the OpenShift internal registry host. You need to type the Username as cecuser.
podman login $(oc get routes -A |grep image-registry|awk '{print $3}') --tls-verify=falseUse the information you have from the OpenShift Token tab you left open on Firefox, copy the string right bellow “Your API token is”.

- Paste the API token on the Password field and press enter.
Login Succeeded!- Use podman push to get the container into the internal registry:
podman push $(oc get routes -A |grep image-registry|awk '{print $3}')/ai/llama-runtime-ubi:latest \
--tls-verify=false
Getting image source signatures
Copying blob 28a720baac6f skipped: already exists
Copying blob 8f522959366b skipped: already exists
Copying blob 8c672c500f73 skipped: already exists
Copying blob fe14819e82ca skipped: already exists
Copying config a85918e36b done   |
Writing manifest to image destination
3.3 Deploy the runtime using Mistral model on the namespace
- Apply the deployment that runs the container just built and downloads the Mistral model from hugging face:
oc apply -f mistral-deploy.yamldeployment.apps/llama-cpp-server createdThe above yaml file is a Kubernetes deployment configuration for an application named “llama-cpp-server”. It specifies that there should be one replica of the application running. The application consists of two containers: “fetch-model-data” and “llama-cpp”.
The “fetch-model-data” container is an init container that fetches a model file from a specified URL and saves it
to a volume named “llama-models”. This container does not start the main application.
The “llama-cpp” container is the main application container. It uses the fetched model file and runs with certain arguments and resource limits. It listens on port 8080 for HTTP requests. The container has readiness and liveness probes to check its status.
The deployment also specifies an emptyDir volume named “llama-models” for the containers to use.
- Apply the service and the route to access the content of the llama.cpp runtime:
oc create -f llama-svc.yamlservice/llama-service createdThe above yaml file defines a Kubernetes Service named “llama-service” with the following specifications:
- It belongs to the “app” namespace and is labeled as “llama-service”.
- The service type is “ClusterIP”, meaning it is only accessible within the cluster.
- It exposes port 8080 (TCP) from the selected pods.
- The service selector matches pods with the label “app: llama-cpp-server”
oc create -f llama-route.yamlroute.route.OpenShift.io/llama-cpp createdThe above yaml file is a Route configuration for OpenShift. It creates a route named “llama-cpp” that directs traffic to the “llama-service” service, using the “llama-cpp-server” target port. The route does not use TLS (tls: null). The application associated with this route is labeled as “app: llama-service”.
- You can verify the status of the runtime readiness by checking the pod status and its progress, as shown below.
oc get podsNAME READY STATUS RESTARTS AGE
llama-cpp-server-664bddbbcc-9fmf8 0/1 Init:0/1 0 1m3s
- You can repeat the command oc get pod until you see the READY 1/1 (in bold italics bellow). It takes about 6 to 8 minutes for its completion.
oc get podsNAME READY STATUS RESTARTS AGE
llama-cpp-server-664bddbbcc-9fmf8 1/1 Running 0 5m43s
- Use this time to read more about the llama.cpp runtime we are using: https://en.wikipedia.org/wiki/Llama.cpp
3.4 Create a namespace and deploy the pre-built Mistral Model container
If you created the Inference library llama.cpp container from scratch by executing the steps in sections 3.1 to 3.3, skip this and go to section 4.
The steps below guide you to using the pre-built llama.cpp container.
- Using the putty console you opened in step 2.3, install git to clone the project with the assets to help us through the Lab. Note that some lab environments might already have git installed.
sudo dnf -y install gitgit clone https://github.com/DanielCasali/mma-ai.gitCloning into 'mma-ai'...
remote: Enumerating objects: 8, done.
remote: Counting objects: 100% (8/8), done.
remote: Compressing objects: 100% (7/7), done.
remote: Total 8 (delta 1), reused 0 (delta 0), pack-reused 0 (from 0)
Receiving objects: 100% (8/8), 6.26 KiB | 6.26 MiB/s, done.
Resolving deltas: 100% (1/1), done.
- Enter the mma-ai/llama-runtime project:
cd mma-ai/llama-runtime/- Create the ai project where we will run the container:
oc new-project aiNow using project "ai" on server "https://api.p1325.cecc.ihost.com:6443".
You can add applications to this project with the 'new-app' command. For example, try:
oc new-app rails-postgresql-example
to build a new example application in Ruby. Or use kubectl to deploy a simple Kubernetes application:
kubectl create deployment hello-node --image=registry.k8s.io/e2e-test-images/agnhost:2.43 -- /agnhost serve-hostname
- Apply the deployment for the ready container runtime that pulls mistral model from Hugging Face.
oc apply -f mistral-deploy-ready.yamldeployment.apps/llama-cpp-server createdThe above describes a Kubernetes Deployment named “llama-cpp-server”. It has one replica and uses the latest version of the specified image for the container. The container is named “llama-cpp” and runs a command to load a model file from a volume. The container exposes port 8080 for HTTP traffic.
The deployment includes an init container named “fetch-model-data” that fetches the model file from a URL if it doesn’t already exist in the specified volume.
The container has readiness and liveness probes configured to check its status. The readiness probe waits 30 seconds before checking if the container is ready, while the liveness probe checks every 10 seconds. Both probes use an HTTP GET request to the root path of the container.
- Apply the service and the route:
oc apply -f llama-svc.yamlservice/llama-service createdThe above YAML file defines a Kubernetes Service named “llama-service” with the type “ClusterIP”. It listens on port 8080 using TCP protocol and forwards traffic to pods selected by the service, which are those labeled as “app: llama-cpp-server”.
oc apply -f llama-route.yamlroute.route.openshift.io/llama-cpp createdThe above YAML file defines a Route resource in OpenShift, which is a way to expose a Service to the internet. The Route has the following characteristics:
- It’s named “llama-cpp”.
- It belongs to the application “llama-service”.
- It points to the Service named “llama-service”.
- It doesn’t use TLS (insecure).
- It uses port 80 (or the port specified by “targetPort” in the Service) and forwards traffic to the “llama-cpp-server” target.
- You can verify the status of the runtime readiness by checking the pod status and its progress, as shown below.
oc get podsNAME READY STATUS RESTARTS AGE
llama-cpp-server-664bddbbcc-9fmf8 0/1 Init:0/1 0 1m3s
- You can repeat the command oc get pod until you see the READY 1/1 (in bold italics). It takes about 6 to 8 minutes for its completion.
- Use this time to read more about the llama.cpp runtime we are using: https://en.wikipedia.org/wiki/Llama.cpp
oc get podsNAME READY STATUS RESTARTS AGE
llama-cpp-server-664bddbbcc-9fmf8 1/1 Running 0 5m43s
3.5 Build and deploy llama.cpp with LLM and OpenShift
If you created the Inference library llama.cpp container in sections 3.1 to 3.4, skip this section and go directly to section 4 to access the llama.cpp application.
The steps below guide you to build and deploy the llama.cpp application within OpenShift.
- Using putty console you opened in step 2.3, install git to clone the project that has the assets to help us through the Lab. Note some lab environments might already have git installed on them.
sudo dnf -y install gitUpdating Subscription Management repositories.
Last metadata expiration check: 3:30:55 ago on Wed 13 Nov 2024 01:51:13 AM EST.
Dependencies resolved.
================================================================================
Package Arch Version Repository Size
================================================================================
Installing:
git ppc64le 2.43.5-1.el9_4 rhel-9-for-ppc64le-appstream-rpms 54 k
Installing dependencies:
emacs-filesystem
noarch 1:27.2-10.el9_4 rhel-9-for-ppc64le-appstream-rpms 9.3 k
git-core ppc64le 2.43.5-1.el9_4 rhel-9-for-ppc64le-appstream-rpms 4.8 M
git-core-doc noarch 2.43.5-1.el9_4 rhel-9-for-ppc64le-appstream-rpms 2.9 M
perl-DynaLoader
ppc64le 1.47-481.el9 rhel-9-for-ppc64le-appstream-rpms 26 k
perl-Error noarch 1:0.17029-7.el9 rhel-9-for-ppc64le-appstream-rpms 46 k
perl-File-Find noarch 1.37-481.el9 rhel-9-for-ppc64le-appstream-rpms 26 k
perl-Git noarch 2.43.5-1.el9_4 rhel-9-for-ppc64le-appstream-rpms 39 k
perl-TermReadKey
ppc64le 2.38-11.el9 rhel-9-for-ppc64le-appstream-rpms 41 k
Transaction Summary
================================================================================
Install 9 Packages
Total download size: 8.0 M
Installed size: 41 M
Downloading Packages:
(1/9): perl-DynaLoader-1.47-481.el9.ppc64le.rpm 257 kB/s | 26 kB 00:00
(2/9): perl-Error-0.17029-7.el9.noarch.rpm 414 kB/s | 46 kB 00:00
(3/9): perl-TermReadKey-2.38-11.el9.ppc64le.rpm 336 kB/s | 41 kB 00:00
(4/9): perl-File-Find-1.37-481.el9.noarch.rpm 487 kB/s | 26 kB 00:00
(5/9): git-2.43.5-1.el9_4.ppc64le.rpm 867 kB/s | 54 kB 00:00
(6/9): perl-Git-2.43.5-1.el9_4.noarch.rpm 591 kB/s | 39 kB 00:00
(7/9): git-core-doc-2.43.5-1.el9_4.noarch.rpm 26 MB/s | 2.9 MB 00:00
(8/9): git-core-2.43.5-1.el9_4.ppc64le.rpm 28 MB/s | 4.8 MB 00:00
(9/9): emacs-filesystem-27.2-10.el9_4.noarch.rp 177 kB/s | 9.3 kB 00:00
--------------------------------------------------------------------------------
Total 27 MB/s | 8.0 MB 00:00
Running transaction check
Transaction check succeeded.
Running transaction test
Transaction test succeeded.
Running transaction
Preparing : 1/1
Installing : git-core-2.43.5-1.el9_4.ppc64le 1/9
Installing : git-core-doc-2.43.5-1.el9_4.noarch 2/9
Installing : emacs-filesystem-1:27.2-10.el9_4.noarch 3/9
Installing : perl-File-Find-1.37-481.el9.noarch 4/9
Installing : perl-DynaLoader-1.47-481.el9.ppc64le 5/9
Installing : perl-TermReadKey-2.38-11.el9.ppc64le 6/9
Installing : perl-Error-1:0.17029-7.el9.noarch 7/9
Installing : git-2.43.5-1.el9_4.ppc64le 8/9
Installing : perl-Git-2.43.5-1.el9_4.noarch 9/9
Running scriptlet: perl-Git-2.43.5-1.el9_4.noarch 9/9
Verifying : perl-Error-1:0.17029-7.el9.noarch 1/9
Verifying : perl-TermReadKey-2.38-11.el9.ppc64le 2/9
Verifying : perl-DynaLoader-1.47-481.el9.ppc64le 3/9
Verifying : perl-File-Find-1.37-481.el9.noarch 4/9
Verifying : git-2.43.5-1.el9_4.ppc64le 5/9
Verifying : git-core-2.43.5-1.el9_4.ppc64le 6/9
Verifying : git-core-doc-2.43.5-1.el9_4.noarch 7/9
Verifying : perl-Git-2.43.5-1.el9_4.noarch 8/9
Verifying : emacs-filesystem-1:27.2-10.el9_4.noarch 9/9
Installed products updated.
Installed:
emacs-filesystem-1:27.2-10.el9_4.noarch git-2.43.5-1.el9_4.ppc64le
git-core-2.43.5-1.el9_4.ppc64le git-core-doc-2.43.5-1.el9_4.noarch
perl-DynaLoader-1.47-481.el9.ppc64le perl-Error-1:0.17029-7.el9.noarch
perl-File-Find-1.37-481.el9.noarch perl-Git-2.43.5-1.el9_4.noarch
perl-TermReadKey-2.38-11.el9.ppc64le
Complete!git clone https://github.com/DanielCasali/mma-ai.gitCloning into 'mma-ai'...
remote: Enumerating objects: 186, done.
remote: Counting objects: 100% (16/16), done.
remote: Compressing objects: 100% (14/14), done.
remote: Total 186 (delta 2), reused 16 (delta 2), pack-reused 170 (from 1)
Receiving objects: 100% (186/186), 159.22 MiB | 51.42 MiB/s, done.
Resolving deltas: 100% (81/81), done.
Updating files: 100% (58/58), done.
- Enter the mma-ai/llama-runtime project:
cd mma-ai/llama-runtime/- Create the ai project where we will run the container:
oc new-project aiNow using project "ai" on server "https://api.p1325.cecc.ihost.com:6443".
You can add applications to this project with the 'new-app' command. For example, try:
oc new-app rails-postgresql-example
to build a new example application in Ruby. Or use kubectl to deploy a simple Kubernetes application:
kubectl create deployment hello-node --image=registry.k8s.io/e2e-test-images/agnhost:2.43 -- /agnhost serve-hostname
- Apply the deployment for the ready container runtime that pulls mistral model from Hugging Face:
oc apply -f ./build-deploy-mistral.yamldeployment.apps/mma-ai created
buildconfig.build.openshift.io/mma-ai created
imagestream.image.openshift.io/mma-ai created
service/mma-ai created
service/llama-service created
route.route.openshift.io/mma-ai created
The above yaml file describes a Kubernetes Deployment named “mma-ai” with the following characteristics:
- It runs one replica of the container.
- The container uses the OpenShift image registry.
- The container uses the mistral-7b-instruct-v0.3.Q4_K_M.gguf LLM and exposes port 8080.
- The container has a health check with an HTTP GET request to the root path (“/”).
- The application also includes a BuildConfig for Docker strategy named “mma-ai” that uses the source code from a Git repository and builds the Docker image tagged as “mma-ai:latest”.
- There is an ImageStream named “mma-ai” that looks up the local image.
- The application has two services, one internal named “mma-ai” and another named “llama-service,” both of which expose port 8080 internally.
- There is a Route named “mma-ai” that exposes the internal service externally with HTTPS termination and insecureEdgeTerminationPolicy set to “Redirect”.
- You can verify the status of the runtime readiness by checking the pod status. You can check its progress as shown below.
oc get podsNAME READY STATUS RESTARTS AGE
mma-ai-1-build 1/1 Running 0 15s
mma-ai-699d775754-wlgp4 0/1 Init:0/1 0 15s
- You can repeat the command oc get pod until you see the READY 1/1 (in bold italics). It takes about 4 to 8 minutes for its completion.
- Use this time to read more about the llama.cpp runtime we are using: https://en.wikipedia.org/wiki/Llama.cpp
watch oc get podsEvery 2.0s: oc get pods p1280-bastion: Wed Nov 13 06:09:26 2024
NAME READY STATUS RESTARTS AGE
mma-ai-1-build 0/1 Completed 0 4m41s
mma-ai-699d775754-wlgp4 1/1 Running 0 4m41s
- Use CONTROL-C to break out if you previously used the watch command to monitor the pods building
4 Opening the Inference runtime UI
Now that we deployed the Inference runtime, we can open and work it from the OpenShift Graphical User Interface.
- From the GUI click on the “Administrator” drop down:

- Toggle to the Developer view by clicking in “Developer”:

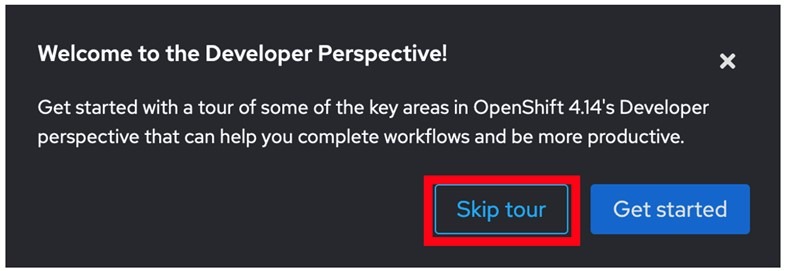
- Click skip tour:
- Click on the AI project:

- Click “Topology”:

- Click the button to open the llama-cpp-server UI:

- Test your Inferencing by querying the inferencing runtime at the “Type a message, (Shift + Enter to add a new line” box)
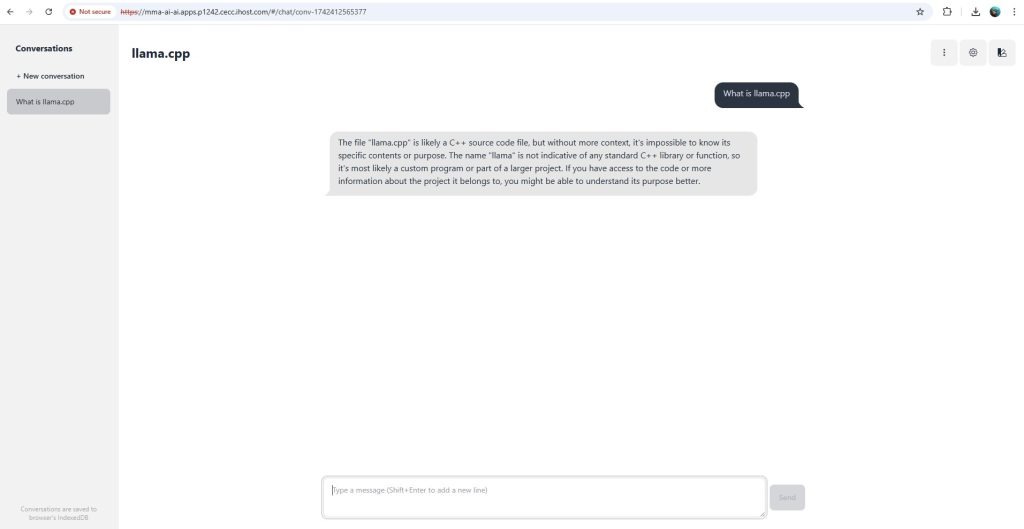
Remember, this AI lab has no access to the system or to the Internet, so it does not know what day today is, or the time-of-day, or what is the weather is like. If you ask something like this, it will generate hallucinations, which will be funny to read.
Some suggestions on how to experiment with this prompt is to ask it which languages it can translate sentences to and then asking it to translate a sentence.
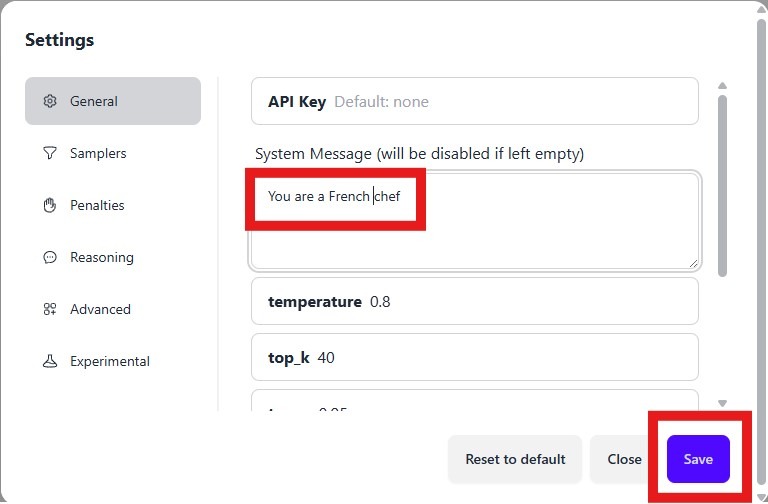
- You can experiment with some prompt engineering input to it and ask it the same question based on different viewpoints. For example, you may tell the model to pretend it’s an Italian chef (tell it in the System Message box) and ask it what the best dish in the word is, as shown below. Then you can tell it to pretend it’s a French chef and ask it the same question. If you don’t see the System prompt anymore in the GUI, just refresh the URL in the browser.
- Select the “settings” gear to get to the System Message box
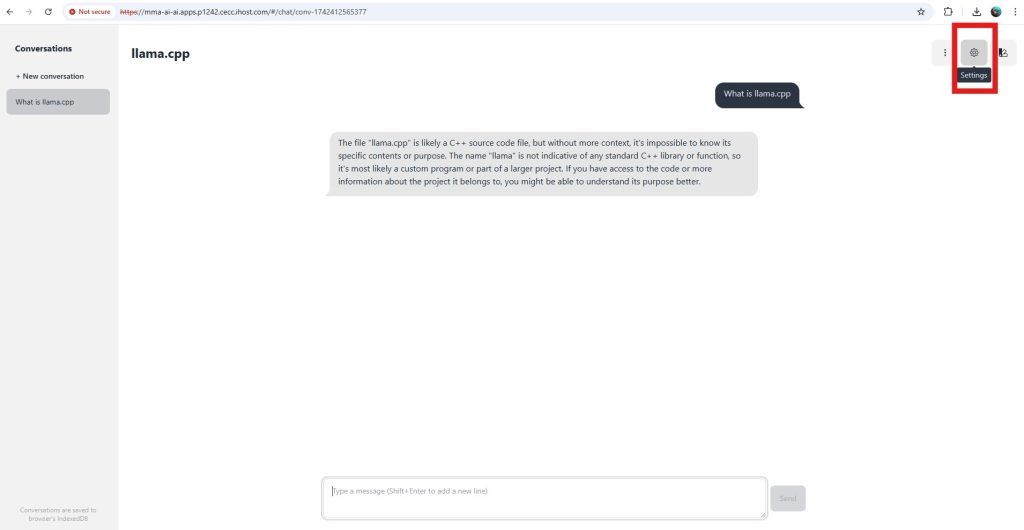
- Add your prompt, for example, “You are a British Chef”, and click save.
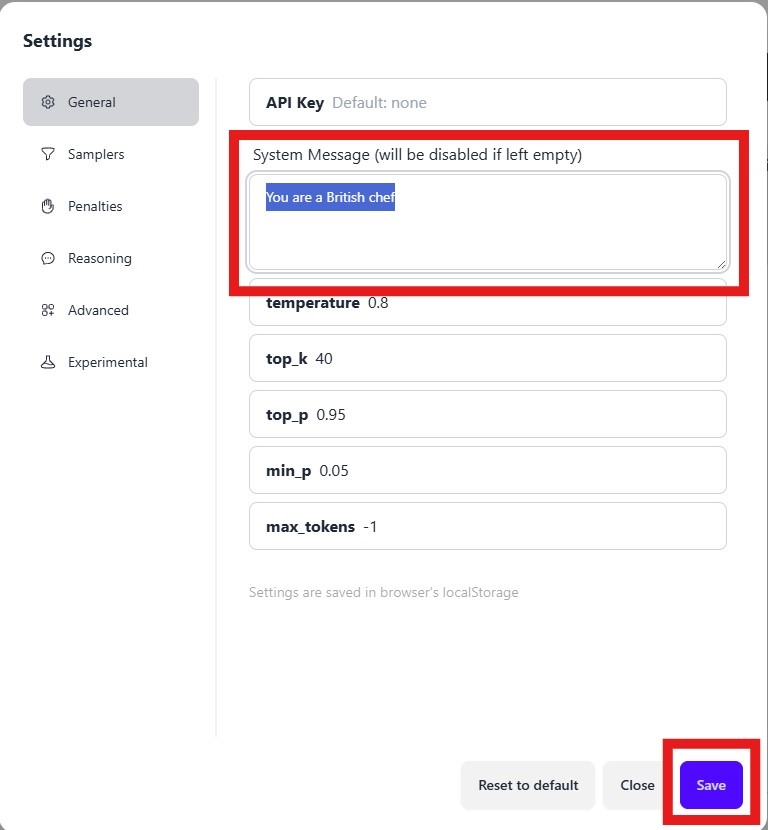
- Start a new conversation, for the new setting to take effect, ask your question and review the answer
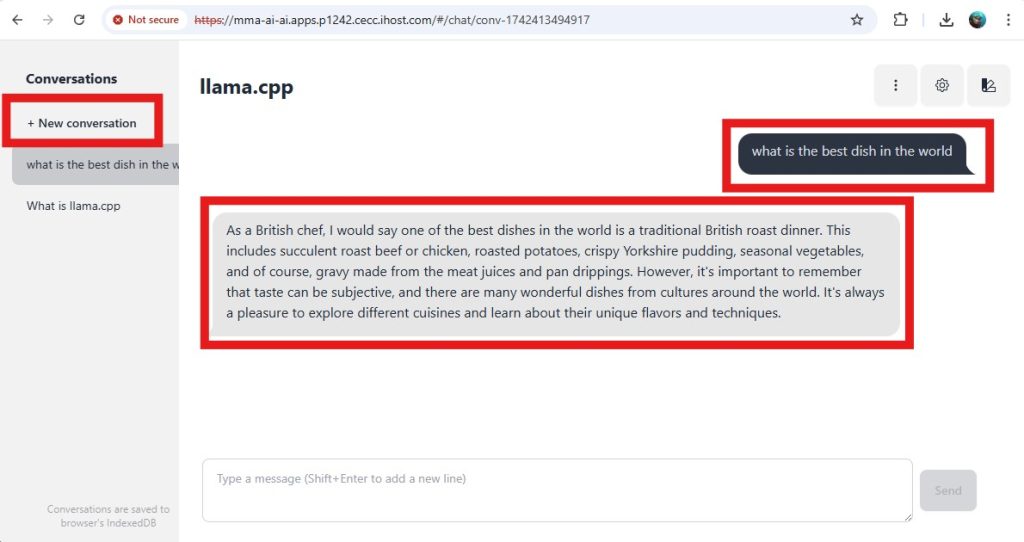
- Change the prompt to a French Chef, by selecting the Settings gear, update and save the new prompt.

- Save the new prompt
- Start a new conversation for the new prompt to take effect
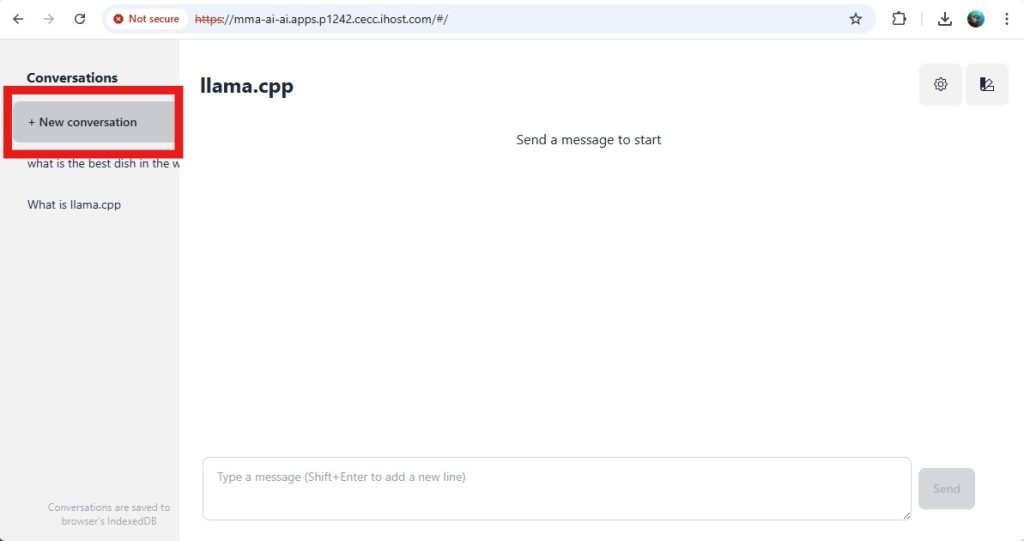
- Ask the question and review the reply, using the new prompt.
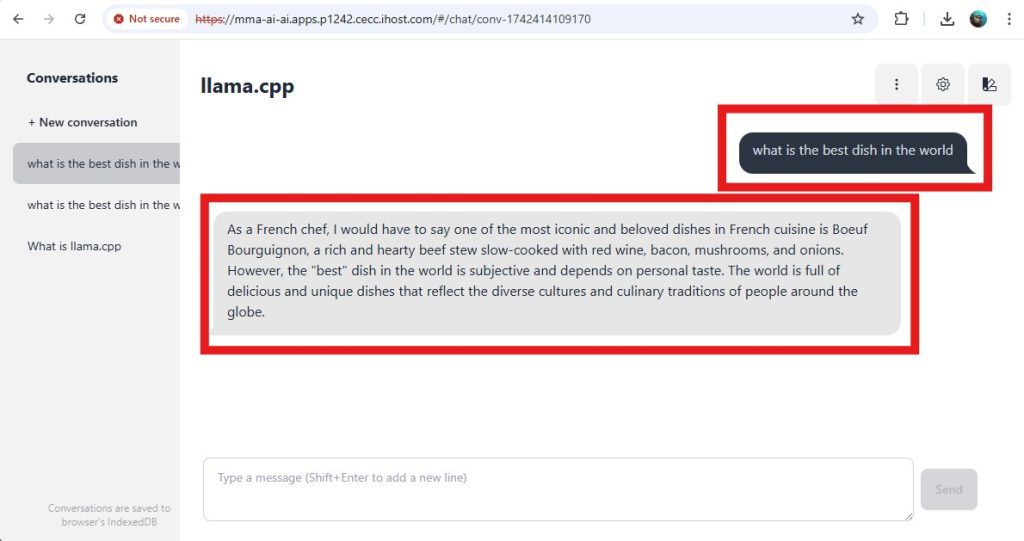
Example questions:
Prompt
You are an Italian ChefQuestion
What is the best dish in the world?Prompt
You are a British ChefWhat is the best dish in the world?Prompt
You are a computer architectWhy should I run AI workloads close to data source?Why should I run AI workloads on IBM Power10?What is IBM Power MMA technology?What is Vector Scalar Extension (VSX)?5 Retrieval Augmented Generation
An approach for using Generative AI with additional or confidential data without using lots of money on expensive GPUs to re-train or fine-tune a model is applying Retrieval Augmented Generation (RAG) to it. RAG allows a pre-trained model to leverage new, updated data provided to it on the fly, and allows the model to generate the answer using that data primarily, as well as being able to tell us where the source for the answer was found.
In the following sections, you will deploy a Vector Database and then use a python application that uses the vector database to perform the Retrieval Augmented Generation.
5.1 Deploying a Vector Database
We will use Milvus vector database as the foundation for this part of the lab.
- Change path to the milvus directory:
cd ../- Apply all yaml files in the directory:
oc apply -f milvus/deployment.apps/etcd-deployment created
service/etcd-service created
deployment.apps/milvus-deployment created
service/milvus-service created
configmap/milvus-config created
persistentvolumeclaim/minio-pvc created
deployment.apps/minio-deployment created
service/minio-service created
route.route.openshift.io/minio-console created
This creates some more elements in your OpenShift AI project as shown by the figure below:
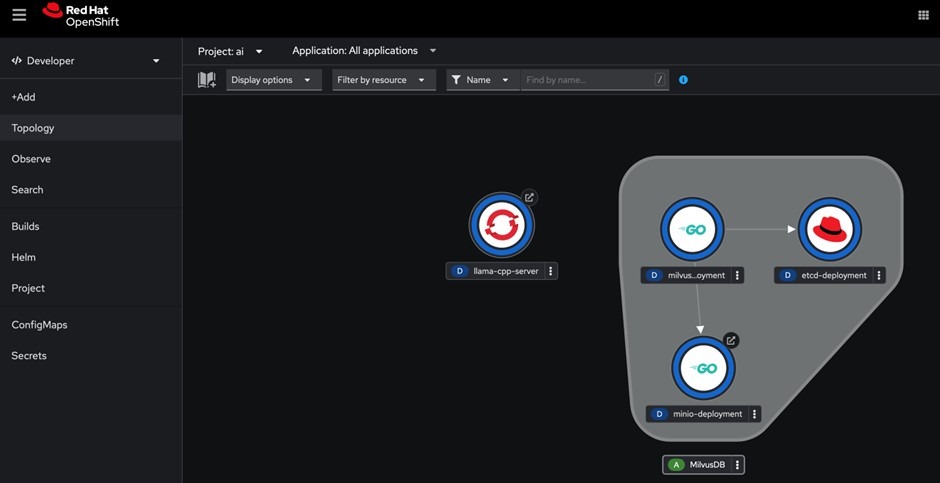
- Next, apply the streamlit definition:
oc apply -f streamlitpod/streamlit created
route.route.openshift.io/streamlit created
service/streamlit created
This creates the Streamlit service as shown in the figure below.
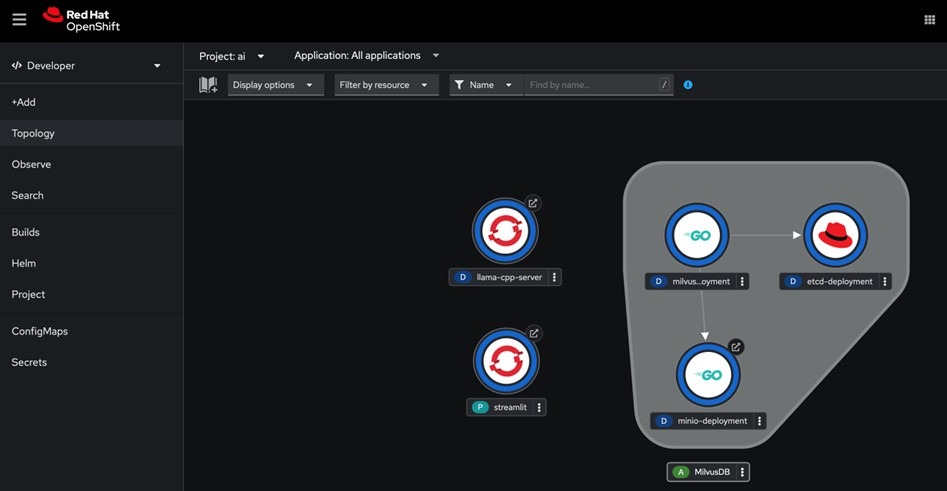
- You may then click on the Streamlit service endpoint to open its interface, as demonstrated in the figure below.
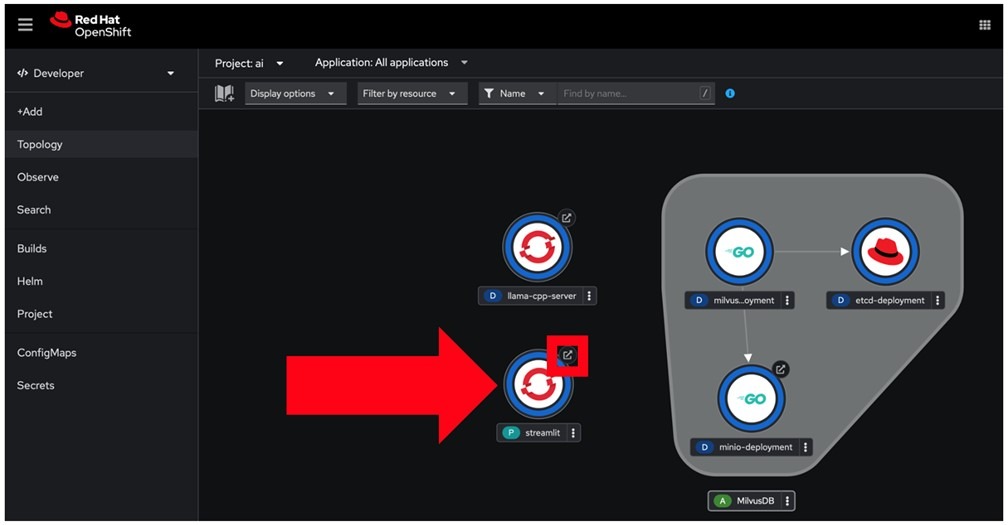
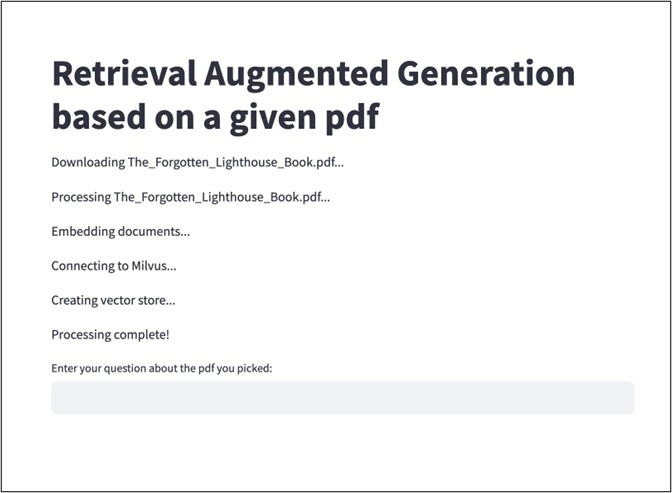
- The Web GUI for the RAG model opens up, loads up the RAG model and such (takes about 3 minutes as it’s building up the vector database), and after that you can interact with a prompt similarly to what’s shown below:
5.2 Querying the RAG model
At this point, the AI model is ready to be queried and was loaded with additional data that it was not trained on and had no idea about it. Specifically, it was loaded with a PDF story which you can find below:
- One interesting question to ask the model is asking it who the starfish is and how does it know about it. To answer that question, the model will have to “read” the book (ie, it was given the PDF to load as additional input data) and inference on the information from it. As you can see in the figure above, Grandpa writes a letter to Sarah and calls her “my little starfish”. So, the AI model should answer the question as Sarah and that it knows it from the letter Grandpa writes to her.
Who is the starfish and how do you know it?
Other questions that you may ask the model about the Forgotten Lighthouse book are available below
The AI model has not been trained on any of that book’s information, so all answers it provides uses RAG and demonstrates how a pre-trained AI model can be extended to inferencing on data without being trained on that data. In real life, this means that you can run a pre-trained AI model on your own data without having ever sending this data out of your premises for training the model itself, and you don’t need to use expensive GPU accelerators for achieving that!
Next Steps
- Please let me know how you get on with this tutorial
- Contact me for help deploying OpenShift and AI on IBM Power.
Clean up
- Remove Git:
sudo dnf remove git- Remove local repository:
cd; rm -rdf mma-ai- Remove project:
oc delete project aiCredit


Leave a Reply